3018 Pro CNC review: This tiny, under-$150 CNC is surprisingly fun and useful | ZDNet
3D printers are additive. Objects are made by building up layer after layer of material. CNCs are subtractive. Objects are made by cutting away layer after layer of material. 3D printers mostly build plastic objects, although there are industrial 3D printers that make metal objects. CNCs mostly cut wood and acrylic, although it’s possible to cut aluminum if you’re careful. Industrial CNCs can also cut steel and other more challenging materials.
The acronym CNC can be a bit confusing. The letters stand for computer numerical control, meaning a computer controls the movement of a machine. As such, 3D printers, laser cutters, and even vinyl cutters (i.e., a Circut) are technically CNCs. But the term CNC is most often used to describe a machine that uses a spinning spindle with an end mill bit that cuts away material. Some big industrial CNCs substitute a spinning end mill bit with a plasma cutter, but that’s a story for another day.
Like
- Inexpensive
- Actually works
- Small footprint
Don’t Like
- Rough documentation
- Spews lots of debris
- Finicky setup
Also: Hands-on: Building the next generation X-Carve CNC (build log)
For the past few months, I’ve talked about my
$2,600 X-Carve CNC.
It has a cutting area of 1,000×1,000 millimeters. The print surface can hold objects up to a little over a three foot square. I recently used it to cut 2 foot by 4 foot plywood sheets into storage racks for plastic parts bins.
The generic 3018 CNC machines
But if you want to get started with a CNC, you can do so far less expensively. In this article, I’m going to show you the
Fan’ensheng 3018 Pro CNC kit.
The unit I have was sent to me by
Banggood,
who also provided a discount coupon you can use. That should bring the price to around $150. I’m told you can enter BGDavidcnc at checkout and it’ll drop the price from $249 to $149 — although it’s only good until the end of March.
Quick note: I’m just passing along the coupon code. I’m compensated solely by ZDNet and don’t get any money from the vendor, whether you buy or not.
There are a ton of 3018 CNCs out there. You can find them at Banggood, Amazon, eBay, and a bunch of other vendors. They’re also sold under a wide range of brand names, although they’re all so similar they probably come from one design spec.
The term 3018 describes the work surface, which is 30 centimeters across by 18 centimeters deep, or just slightly larger than an iPad Air or iPad Pro, measured edge-to-edge.
3018s come in a variety of build outs. The differences are mostly in the build quality of the frame, which can be plastic in some machines and metal in others. What makes the 3018 so interesting is that there’s a vibrant add-on market as well, so you can upgrade and tweak these things, adding everything from a more powerful spindle to dust collection — and trust me, you want to have dust collection for a CNC, no matter how small it is.
Building the machine
Nearly all 3018s come as kits, and mine was no exception. Because it’s smaller, there are a lot fewer parts than came with my X-Carve. As a result, build time is decreased. You can probably get it done in an evening.
Assembly is a bit challenging, but not impossible. The build instructions are mostly diagrams, which are not great, but not terrible. They’re not 100% accurate, but they’ll definitely get you into the neighborhood. If you augment the build instructions by watching YouTube build videos, and are willing to undo and redo some of the build as you go along, you’ll be fine.
While some YouTubers claim they built this in an hour, I’d recommend you allocate a weekend. It probably won’t take more than an evening, but if you need to step away to regain your composure, you’ll have budgeted the time.
Let me be clear. This is a very fun machine that’s also actually useful. More on that below. If you have any electronics or machine building experience, putting this together will be a blast. It’s just hard enough to be a compelling challenge, but not so hard that you won’t succeed. If you’ve ever built your own PC, you’ll be golden.
The build frustration is not enough to put you off the project, but just enough that it’s deeply satisfying when it’s done and working.
Some build tips
Alignment (especially on the gantry) can be a bit time-consuming to get everything in place properly, but if you use calipers to measure the top and bottom of the gantry base, it’ll sit just right on the machine. I have
a cheap $22 pair I bought from Harbor Freight
a bunch of years ago and have used ever since.
The horizontal frame is constructed from 20×40 slotted aluminum extrusion. The tapped holes for screws were a bit messy, so it might be a good idea to clean them out. I didn’t re-tap the holes since I don’t have a tap and die set, but it’s not a bad idea to consider doing so. You might also consider shooting the holes with air from a compressor or air from a can of air.
It’s a good idea to have some alignment tools at hand when squaring up the build table. I like using 1-2-3 blocks because they’re absolutely precise and heavy enough to hold things in place. Here’s a tip-within-a-tip:
1-2-3 blocks
are very useful to have around, so I’d recommend picking a set up. I’m constantly using mine in one project or another.
The logic board is clean, well-labeled, and nicely made. It’s a good quality PC board. Just be careful with plugging in the X, Y, and Z axis. They’re marked, but it’s easy to get confused.
Build quality
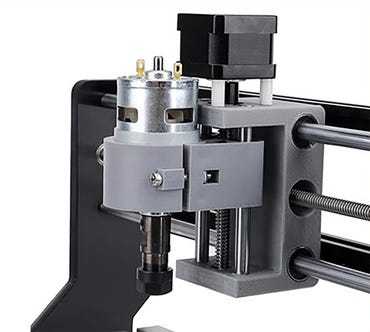
This is a surprisingly robust little machine for the price. As I mentioned, the base is extruded aluminum. The threaded drive rods are sturdy steel. But the gantry columns are plastic, as are the front and back of the frame. In pictures, they look like metal, but they’re really thick plastic.

The stepper motors that move the gantry are quite small, but they’re adequate for this size machine. Just don’t stress them too much.
I was pleased to see that the entire Z-axis and spindle motor assembly were built at the factory and shipped pre-assembled. The spindle motor is a 150W 775 motor, which is a bit weak. Fortunately, the 775 is a pretty standard size, so it’s possible to upgrade to a stronger spindle. That said, don’t over-size the spindle without upgrading the Z-axis, because the assembly that shipped from the factory is made from plastic.
The plastic components did result in some wobble in the machine. Ideally, a CNC should be rock solid, so the end mill goes exactly where the computer sends it. But the forces of acceleration and inertia do act against the plastic parts, causing slight vibrations. The machine is quite loud, in large part because of the vibrations inherent in the plastic parts.
That wobble leads to a small impact on precision. You can create some really fine carvings, but you’ll need to be very conscious of feeds and speeds, adjusting spindle rotation speed, movement speed, and depth per cut until you reach a “just right” level of performance for your bit and the material you’re cutting. It is very much doable. It just takes some trial and error.
Just be careful. Too much of anything and you might break a bit. Replacements aren’t terribly expensive, so that’s not really much more than an inconvenience. And as long as you don’t get too impatient with your cuts, you’ll be fine. Like the machines, you can pick up spare bits from Banggood, Amazon, and eBay. Just don’t buy drill bits. What you want are called end mill bits and they cut from the side, not the end of the bit.
dust collection adapter
right away. Trust me on this. CNCs produce an insane amount of dust.
Overall impressions
The big takeaway is that this is a small but functional machine. There is a learning curve, but there are rewards at the end of the road. You can make things on this device, learn about the CNC process, and hone your skills.

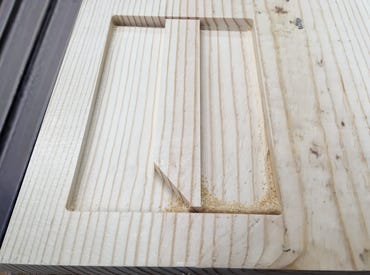
Test cut. You can see my artsy skills at work.
The perfect application for this machine is prototyping PCBs (printed circuit boards). It can easily cut the copper traces and drill lead holes through the boards. It’s precise enough to make good quality boards and big enough to make all but the most complex PCB projects.
Another obvious application is sign-making and bas-relief carving. Depending on the bits you use and the designs you send to the machine, you should be able to get some fine quality output, as long as you don’t need to make anything bigger than about 7×11 inches.
If you have the budget, this would also make an absolutely knock-it-out-of-the-park gift for someone into electronics, building, crafting, and making. It’s inexpensive enough to be affordable as a generous gift, small enough to be wrapped in gift wrap, and surprising enough to make anyone’s day who gets it and likes to build things. Just make sure you leave enough lead time when ordering since it will more than likely have to be shipped internationally.
What about you? Do you think you might buy one of these for yourself or as a gift? Have you done any CNC work before? Let us know what you think in the comments below.
You can follow my day-to-day project updates on social media. Be sure to follow me on Twitter at @DavidGewirtz, on Facebook at Facebook.com/DavidGewirtz, on Instagram at Instagram.com/DavidGewirtz, and on YouTube at YouTube.com/DavidGewirtzTV.
For all the latest Technology News Click Here
For the latest news and updates, follow us on Google News.
