How to add an appendix to a table of contents in Microsoft Word
When creating an appendix isn’t as cut and dried as the default table of contents supports, try mapping!
Image: justplay1412/Shutterstock
An appendix should probably be included in a document’s table of contents. In Microsoft Word, if you use the same level 1 heading for your section headings, including the appendix, you’ll have no problem. However, sometimes that’s not possible because the appendix heading uses a different format. Initially, you might be a bit stymied by that requirement, but it’s not difficult at all. In this article, I’ll show you how to include an appendix in the table of contents when you can’t use the same built-in level heading as other sections.
SEE: 83 Excel tips every user should master (TechRepublic)
I’m using Microsoft 365 on a Windows 10 64-bit system, but you can use earlier versions. You can work with your own data or download the demonstration .docx and .doc files. Word Online will display a table of contents, but you can’t make the modifications shown in this article.
Why is the appendix in Word a problem?
If a document includes an appendix and you want the appendix in the table of contents, the simplest solution is to apply a built-in heading style to all section headings. Word includes Heading 1, Heading 2, and Heading 3 in the table of contents by default. For example, if you use Heading 1 for all the section headings, you could also use Heading 1 for the appendix heading.
But what happens when you must apply a different set of formats to the appendix heading? You might try direct formatting, or you might modify Heading 4, Heading 5, and so on. Let’s try both of these possible solutions and see what happens.
How to apply direct formatting
The document shown in Figure A has only two pages: Chapter 1 and Appendix. Both headings use the built-in heading style Heading 1. Each section has a second level that uses Heading 2. Now, let’s suppose you want the appendix heading to also be italicized: Select the appendix heading on page 2, Appendix, and apply italics.
Figure A

We’ll add the appendix to a table of contents in this simple document.
Now, let’s add a simple of table of contents, as follows:
- Move the insertion point to the beginning of page 1, before the Chapter 1 heading.
- Click the References tab.
- In the Table of Contents group, click Table of Contents.
- Choose the first option to include a simple table of contents, as shown in Figure B.
Figure B

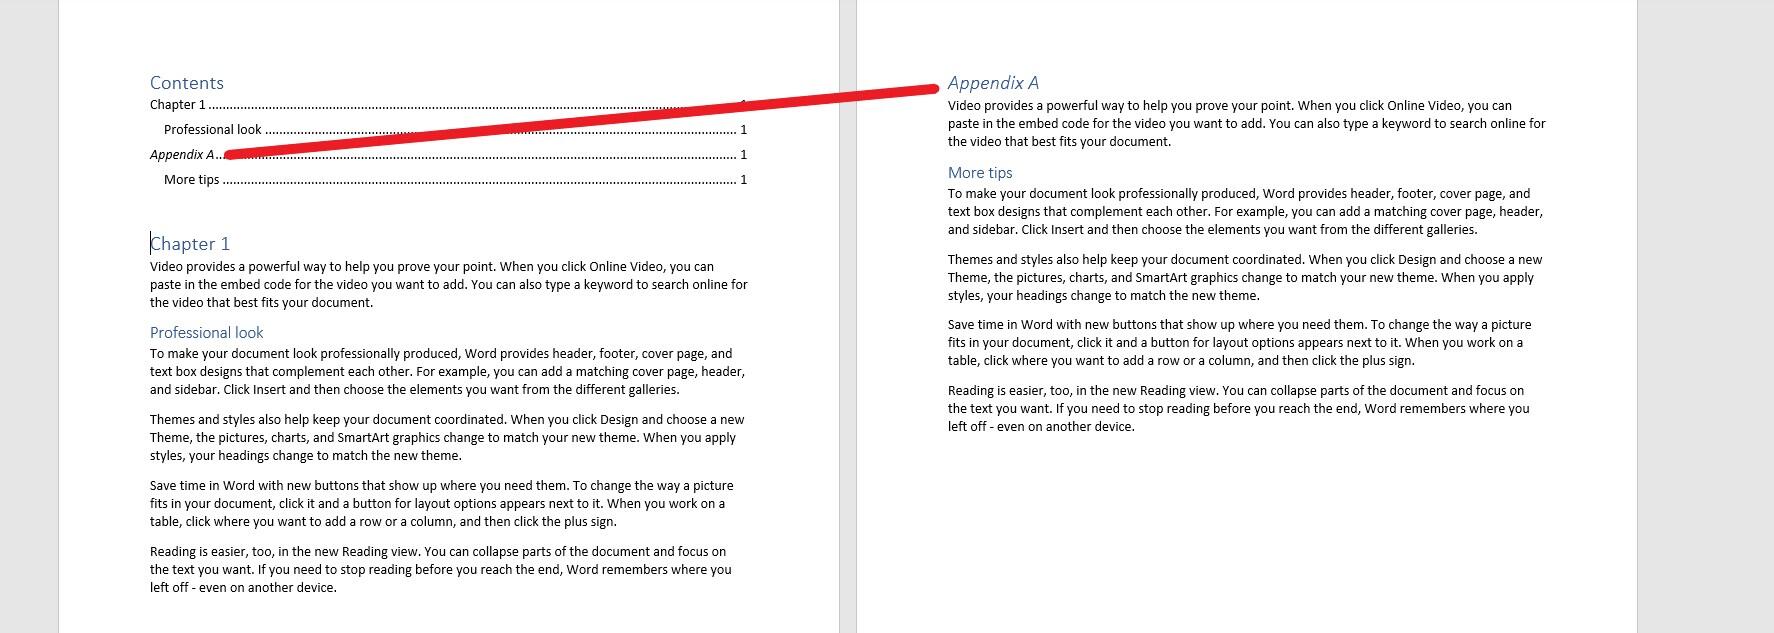
The table of contents inherits the direct formatting—it displays the italics.
The table of contents has its own built-in style. However, whether you want it or not, the table of contents displays the italics because the table of contents inherits direct formatting. Most likely, you’ll want all same-level headings to appear the same in the table of contents.
SEE: Windows 10: Lists of vocal commands for speech recognition and dictation (free PDF) (TechRepublic)
How to use a lower-level heading to add the appendix entry in Word
As mentioned earlier, Word includes Heading 1, Heading 2, and Heading 3 headings in the table of contents by default. This document isn’t using Heading 3, so let’s apply Modify Heading 3 to include italics and then apply it to the appendix heading as follows:
- First, clear the formatting from the appendix heading if you applied italics in the last section. Select it and apply Normal in the Styles gallery (on the Home tab).
- With Appendix still selected, click Heading 3 in the Styles gallery.
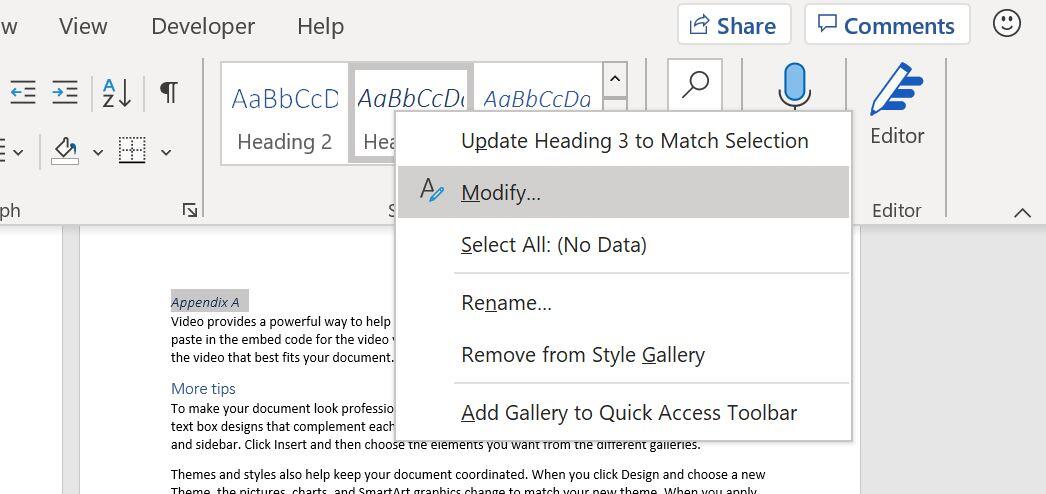
- Right-click the thumbnail in the gallery and choose Modify (Figure C).
- In the resulting dialog, click the Italics icon and click OK. You could update other formats, but let’s keep it simple for now.
Figure C

When you return to the document, Appendix is italicized. Now let’s see how the table of contents displays this change. Click inside the table of contents at the top of page 1, click the Update Table tab and when prompted, click the Update Entire Table option shown in Figure D. As you can see in Figure E, the Appendix heading is no longer italicized, but it’s in a level three position! Well, we chose Heading 3, so we should’ve expected that, correct? The problem is, you’ll want the Appendix heading on the same level as Chapter 1 because structurally, the are on the same level.
Figure D

Update the entire table.
Figure E

The table of contents positions the Appendix heading in the wrong level.
If you thought either of these solutions might work, don’t be troubled. They seem reasonable off the top of your head.
How to solve the problem in Word
The solution is to modify a lower-level heading as you did in the last example, and then map it to the table of contents. If the term mapping is new to you, don’t worry.
At this point, we’re starting over, so remove the existing table of contents and apply the Normal style to Appendix (the heading on page 2). To begin, do the following:
- Select Appendix (the heading on page 2).
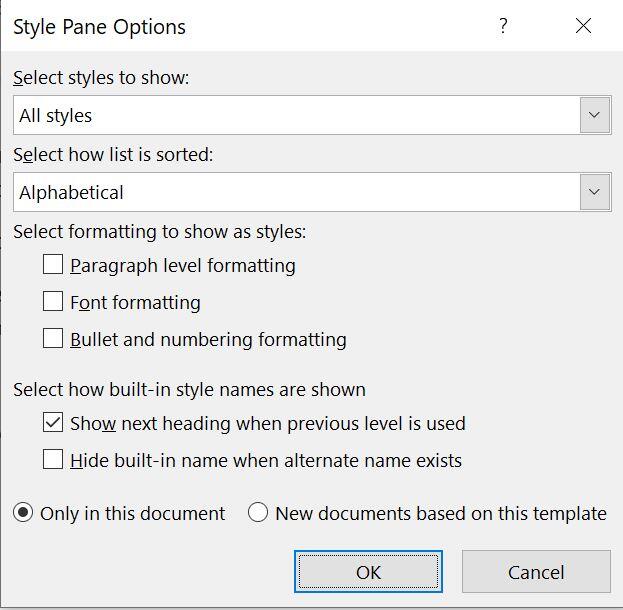
- Choose Heading 6 from the Styles gallery, if available. Right-click the thumbnail and choose Modify. If Heading 6 isn’t available, and it probably isn’t, click the Styles group More button, and click Options at the bottom of the Styles pane. From the Select Styles to Show dropdown, choose All Styles. From the Select How List is Sorted dropdown, choose Alphabetical (Figure F). Find Heading 6 is the Styles pane, right-click it, and choose Modify.
- In the resulting dialog, click the Italics icon and click OK. You could update other formats to make it matching Heading 1, but let’s keep it simple for now.
Figure F

Add the heading to the Styles pane.
I chose Heading 6 because it’s unlikely to be used for other headings in such a simple document. In addition, you need to know how to find a style that’s not in the Styles pane.
Appendix at the top of page 2 now uses Heading 6, but we already know that a default table of contents won’t include Heading 6 text. To include that level, we must map it using a custom table of contents as follows:
- Move the insertion point to the beginning of the document, click the References tab, and then click the Table of Contents option in the Table of Contents group. At this point, it’s the same as the built-in table of contents you chose earlier.
- Instead of choosing the first option, choose Custom Table of Contents. Take a minute to look around at the different settings. The preview windows show Heading 1, Heading 2, and Heading 3—the headings the table of contents includes by default.
- Click Options.
- Right now, you can see that the three headings are mapped as you might expect: Heading 1, 1; Heading 2, 2; and Heading 3, 3. Map Heading 6 in the resulting window: Thumb down to Heading 6 and enter 1, as shown in Figure G. Why 1? Because structurally, Appendix should be on the same level as Chapter 1, which is Heading 1, level 1.
- Click OK twice to return to the document.
Figure G

Map Heading 6 to the table of contents level 1.
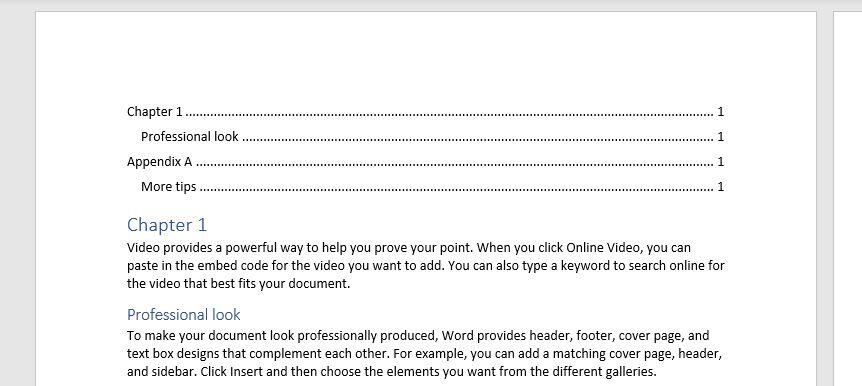
Figure H shows the custom table of contents. Appendix is a level 1 heading, and it isn’t italicized, even though the heading within the document is.
Figure H

Mapping the modified Heading 6 solves both problems!
Word’s table of contents feature does a great job most of the time. However, when you have special requirements such as those described in this article, you might need to turn the custom options. Knowing what you can do makes all the difference.
Also see
For all the latest Technology News Click Here
For the latest news and updates, follow us on Google News.

