How to use a laptop as a monitor
There are many reasons why you might want to know how to use a laptop as a monitor. Whether you’re using your laptop for work, studying or creative purposes, one screen sometimes just isn’t enough when it comes to productivity.
Fortunately, setting up a dual-screen workstation is easy when you already own a laptop — or more than one — and at least one external monitor.
With just a couple of quick adjustments in the settings menu, you’ll be able to extend your laptop’s screen onto that of your external monitor(s) — or vice-versa. And if you’re a desktop owner and you want your laptop to act purely as a screen that projects your PC, that’s also an option, though admittedly a slightly more complicated one.
Really, there are two separate use cases here, so we’ve split them out below.
In the first, we’ll give you step-by-step guide on how to use your laptop with a second monitor, on both Windows and macOS systems, so you can extend your desktop and not have to look at lots of cramped windows.
In the second, we’ll show you how to use your laptop as a monitor for your desktop PC, which could be helpful if, for instance, your usual monitor just died.
Either way, be make sure to have a suitable display cable at hand (and if you’re a macOS user, check if you also need an adaptor). Depending on your laptop model, you might need either an HDMI cable, DisplayPort, or a mini-DisplayPort lead. Grabbed it? Alright, then you’re ready to start with the process.
How to extend your laptop display on Windows
1. Navigate to the left end of your taskbar (on the bottom of your screen) and press the ‘Start’ button. Alternatively, tap on the Windows key to trigger the main menu.
2. Select the settings icon on the left side of the menu, which should open the settings menu.
3. Click on the Display option located on the top left corner of the menu.
4. Once your display cable is successfully plugged in, you should be able to view numbered rectangles that indicate your connected and existing displays under the ‘Select and rearrange displays’ section. If you’re not seeing it, double-check your cable connection. Still no luck? Click on ‘Detect’ to force your device to search for a display.
5. Scroll down to the ‘Multiple displays’ section and select ‘Extend these displays.’
6. And in case you’re unsure about which screen is which (as shown in the ‘Select and rearrange displays’ section), select ‘Identify’. This will force a corresponding number to pop on on each display. You can rearrange the displays by dragging them to fit your desired placement.
Congrats! You’re all set up.
How to extend your laptop display on Windows

1. Navigate to the left end of your taskbar (on the top of your screen) and press the Apple menu button.
2. Select ‘System Preferences’, which should trigger the settings menu.
3. Click on the ‘Displays’ option located in the bottom left corner. This should open up a new window.
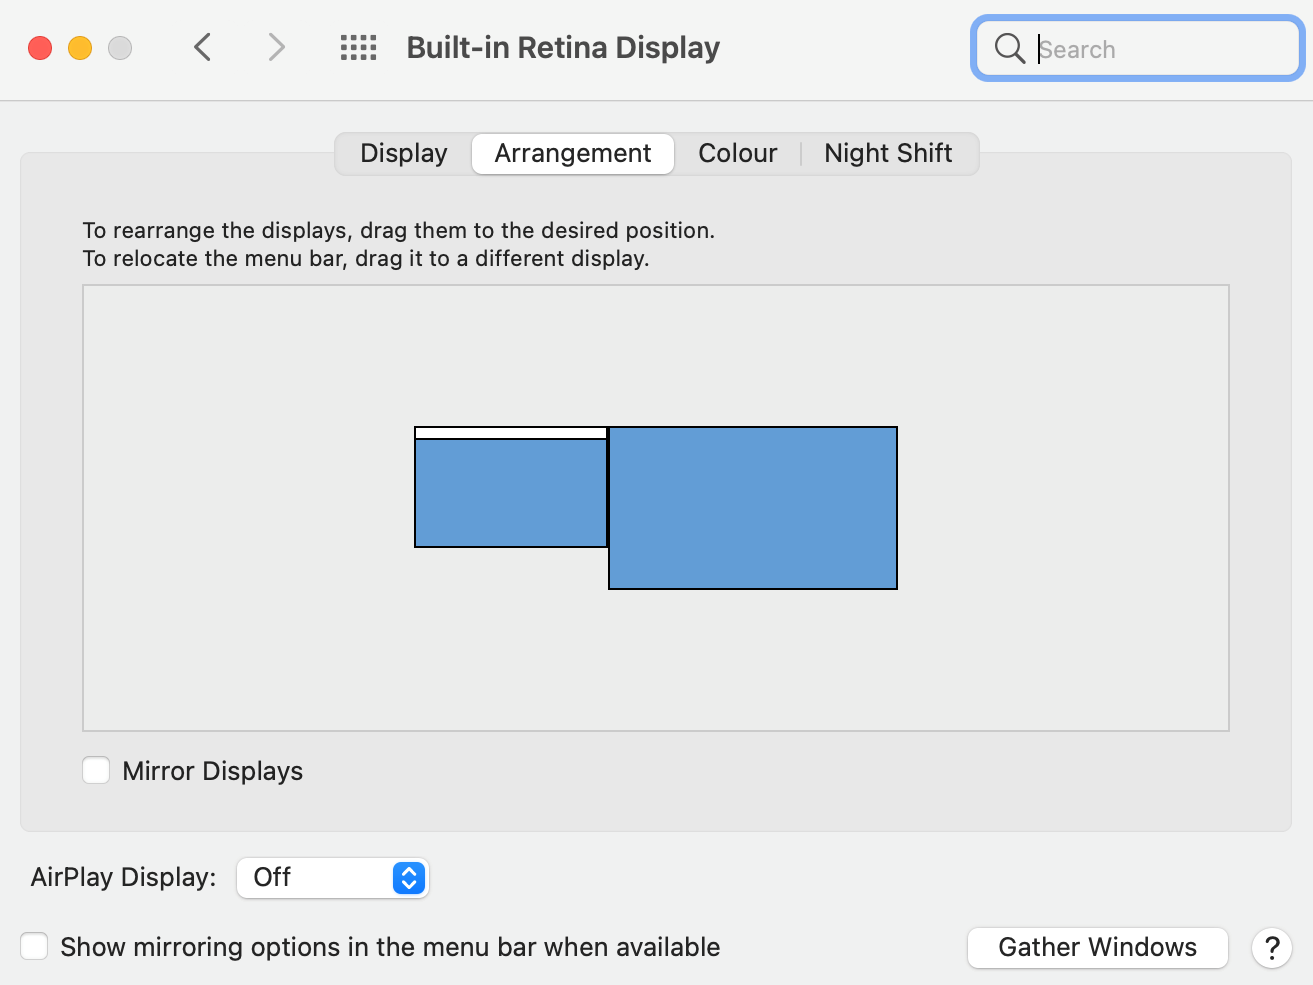
4. Once your display cable is successfully plugged in, select the ‘Arrangement’ tab, which should appear as the second option at the top of the menu.
5. You should now be able to see blue rectangles that indicate your connected and existing displays. The one with the white tab on top of it is your main display. Just make sure that the Mirror Displays option is unticked.
6. To rearrange the displays, drag the rectangles over to the desired placement. You can also relocate the menu bar by dragging it in order to change your primary display.
Congrats! You’re all set up.
How to use a laptop as a monitor for your desktop PC
1. On your Windows laptop, navigate to the left end of your taskbar (on the bottom of your screen) and press the ‘Start’ button. Alternatively, tap on the Windows key to trigger the main menu.
2. Select the settings icon on the left side of the menu, which should open the settings menu.
3. Click on the ‘Projecting to this PC’ option, which should appear as the tenth option from the top.
4. Once your desktop machine is connected to your desired laptop, go ahead and change the first drop-down menu from ‘Always off’ to ‘Available everywhere on secure networks’. You can also set up a PIN for pairing and ‘Ask to project to this PC every time a connection is requested’ (you can adjust those two settings to fit your preference).
5. On your desktop PC, select the ‘Action Center’ icon located on the bottom right corner of the screen. Then click on ‘Connect’ and wait until your laptop appears on the screen. Once you see it pop up on your display, go ahead and select it.
6. You will then need to turn to your laptop and accept the connection request. And if you’ve set up a PIN when pairing your machines, at this stage you will need to type it in.
7. Right-click on your desktop device and select ‘Desktop settings’. Open up the display menu and select the ‘Extend desktop to this display’ option. You can now rearrange the displays by dragging them to the preferred position.
All done!
For all the latest Technology News Click Here
For the latest news and updates, follow us on Google News.
