How to check battery health in Windows 10
It’s useful to know how to check battery health in Windows 10. Battery life is one of the key metrics we look at when recommending laptops, and for good reason: a laptop isn’t much good if it can’t last long enough to meet the demands of your daily life.
That’s why we generally believe the best laptops are the ones that can last at least 10+ hours on a single charge. But laptop batteries are complex wonders, and the amount of juice they can give you is influenced by a variety of factors: age, temperature, power demands, and much more.
That’s why it’s important to know not just how long your battery can last before it needs a recharge, but how healthy it is — an old, ailing battery won’t last as long as it did when it was new, and in some cases it can get so worn out that it makes sense to replace it.
Windows laptops have a useful but unheralded feature that can help you diagnose the health of your battery. It’s called the Battery Report tool, and in this article we’re going to show you how to use it to get the most out of your laptop.
How to check battery health in Windows 10: Run Battery Report
The Battery Report tool is hidden just below the surface of Windows 10, but it’s easy to use once you know where to look. The trick is to use the Windows command prompt — here’s how:
1. Open the Start menu by clicking it (or by pressing the Windows key on your keyboard) and launch the Command Prompt.
The easiest way to do that is to just start typing “Command Prompt” into the search box — it should appear near the top of your search results pretty quickly.
If that doesn’t work, you can manually scroll down the Start Menu’s app list and find Command Prompt under the Windows System section. Click the Command Prompt app to launch it.
2. Once you have the Command Prompt open you should see a black window with white text spelling out a command line — likely starting with C: and ending with your Windows user name.
Now it’s time to get to work: type powercfg /batteryreport (make sure there’s a space between the two terms) and press Enter.
3. Assuming everything went smoothly, you should see a message in the Command Prompt informing you that a battery report has been saved to your user folder. Great work!
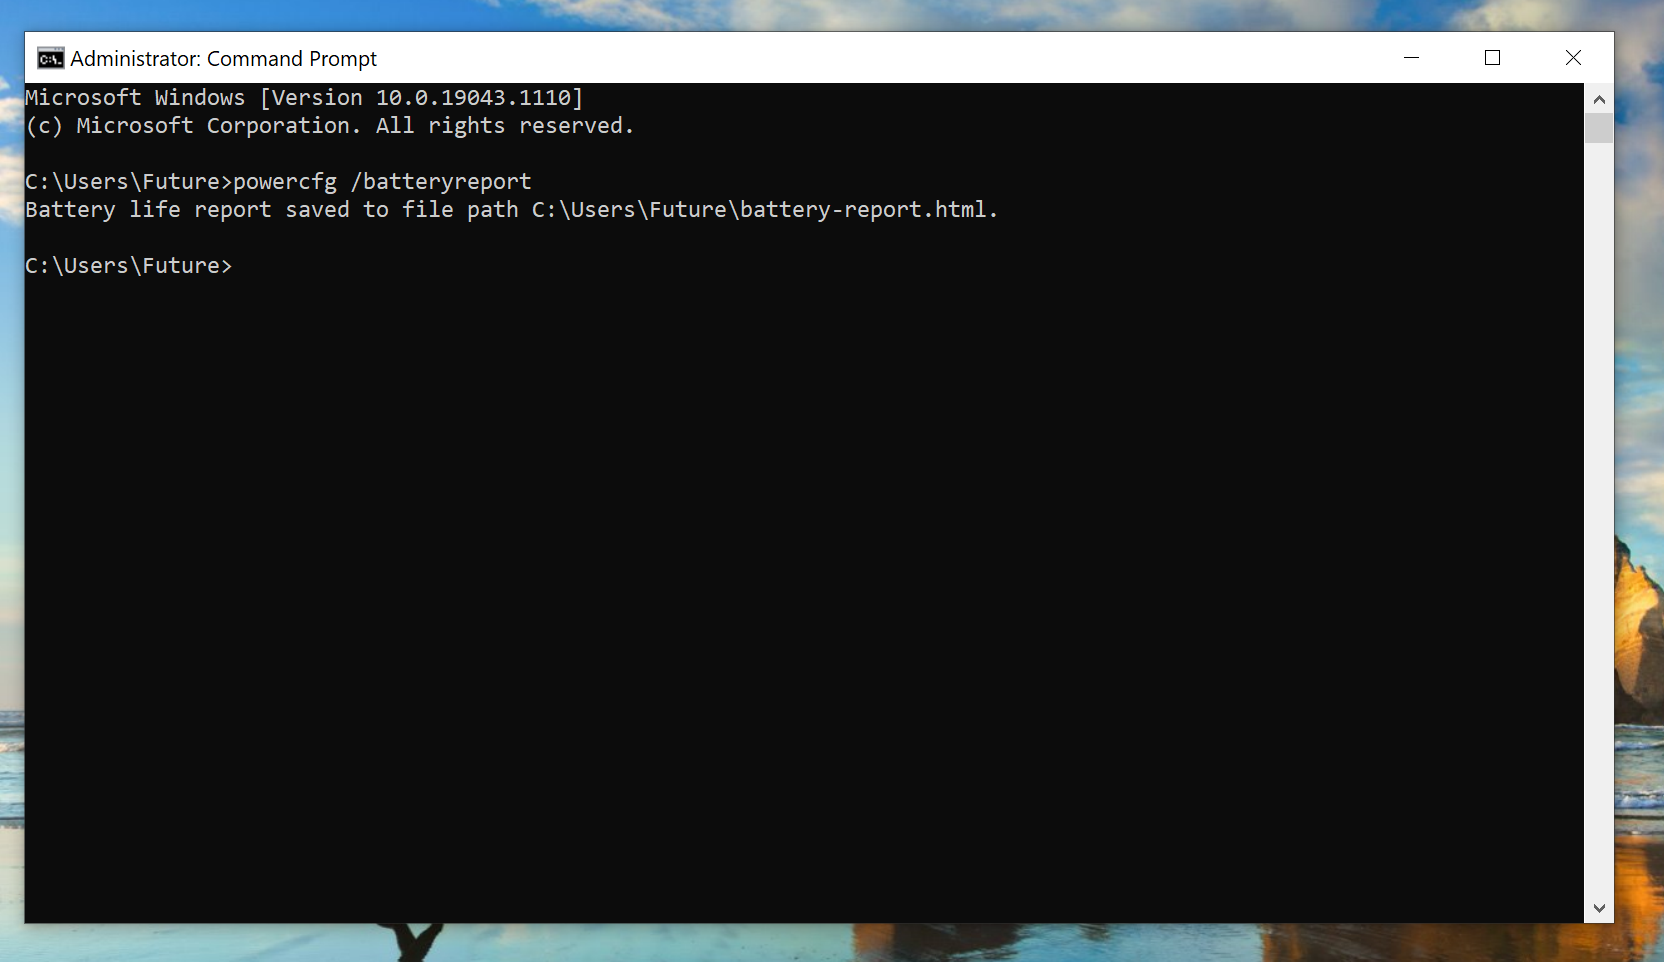
4. Now you need to find that report and read it. The fastest way is to open File Explorer (if you can’t find it, type “File Explorer” in the Start Menu search box) and navigate to the folder where the Command Prompt told you your battery report was saved.
By default this is your user folder (C:Users[yourusernamehere]), but if you can’t find the battery report there you can also try searching for it on your hard drive. Just open the Start Menu again and type battery report to start a search.
If it doesn’t show up right away, wait a few minutes (Windows sometimes takes time to register new files and index them for search purposes) then try your search again.
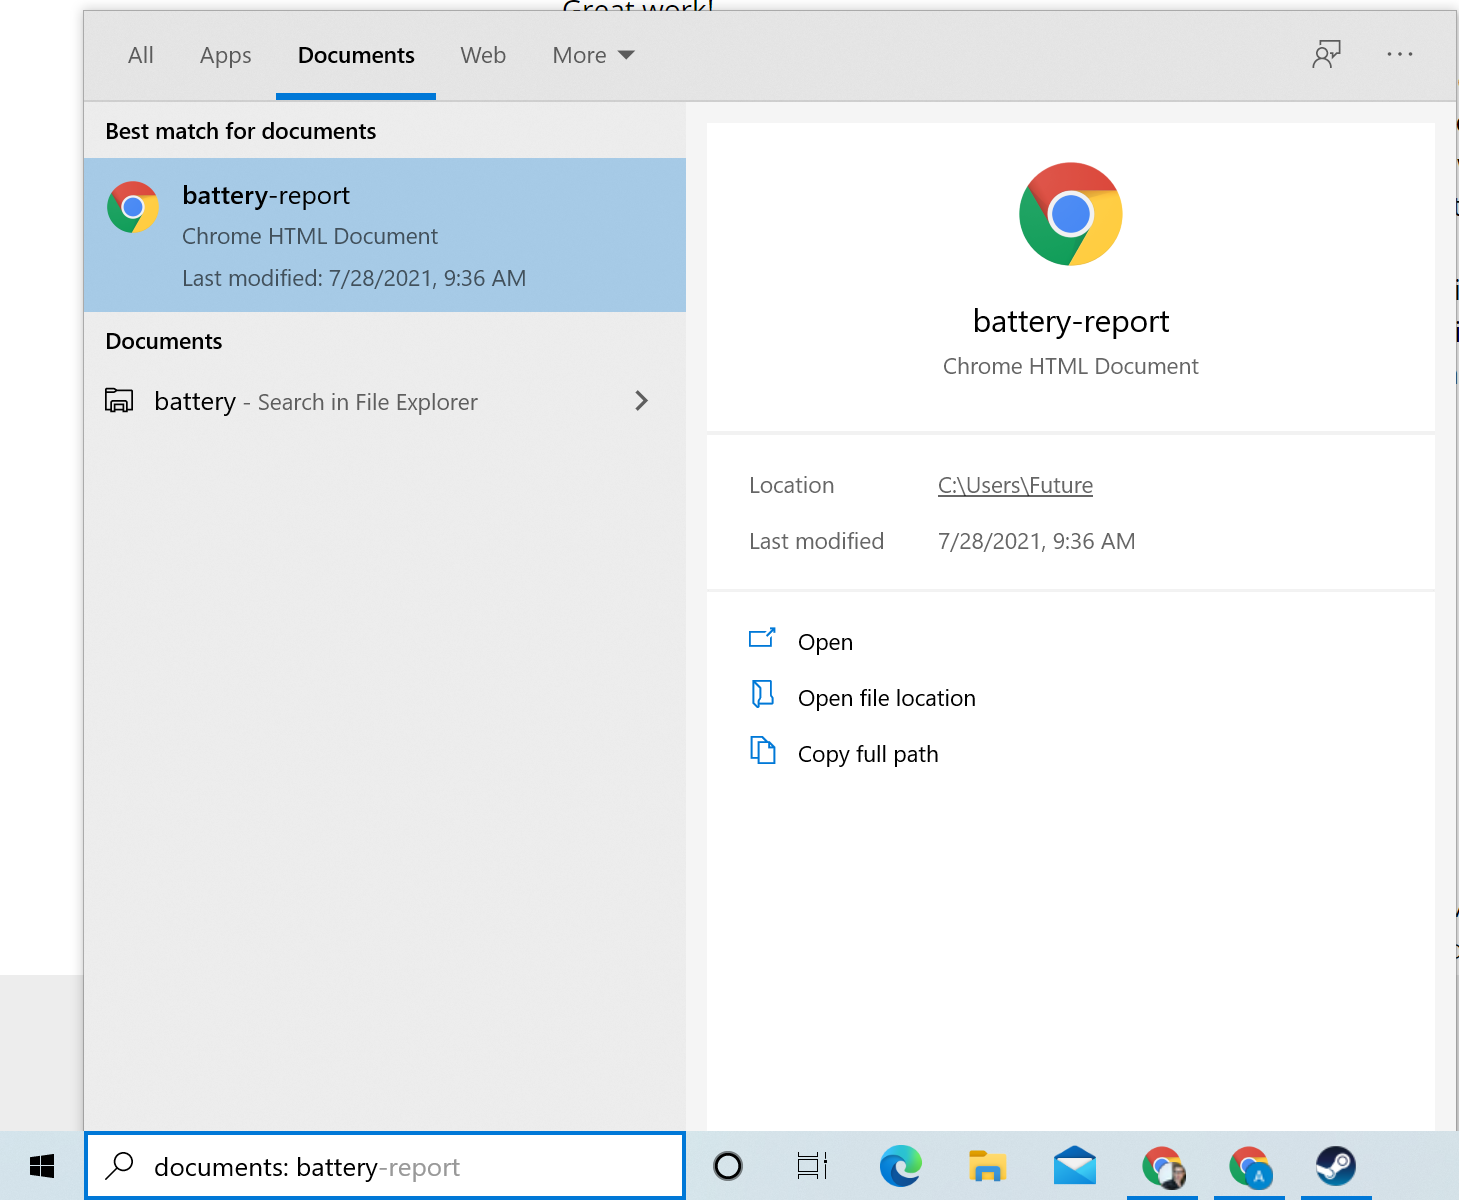
5. Open the battery report and have a look! It will be saved as an HTML file, so Windows should automatically open it using a web browser.
The report should look like a long list of information, including battery life estimates and battery usage reports.
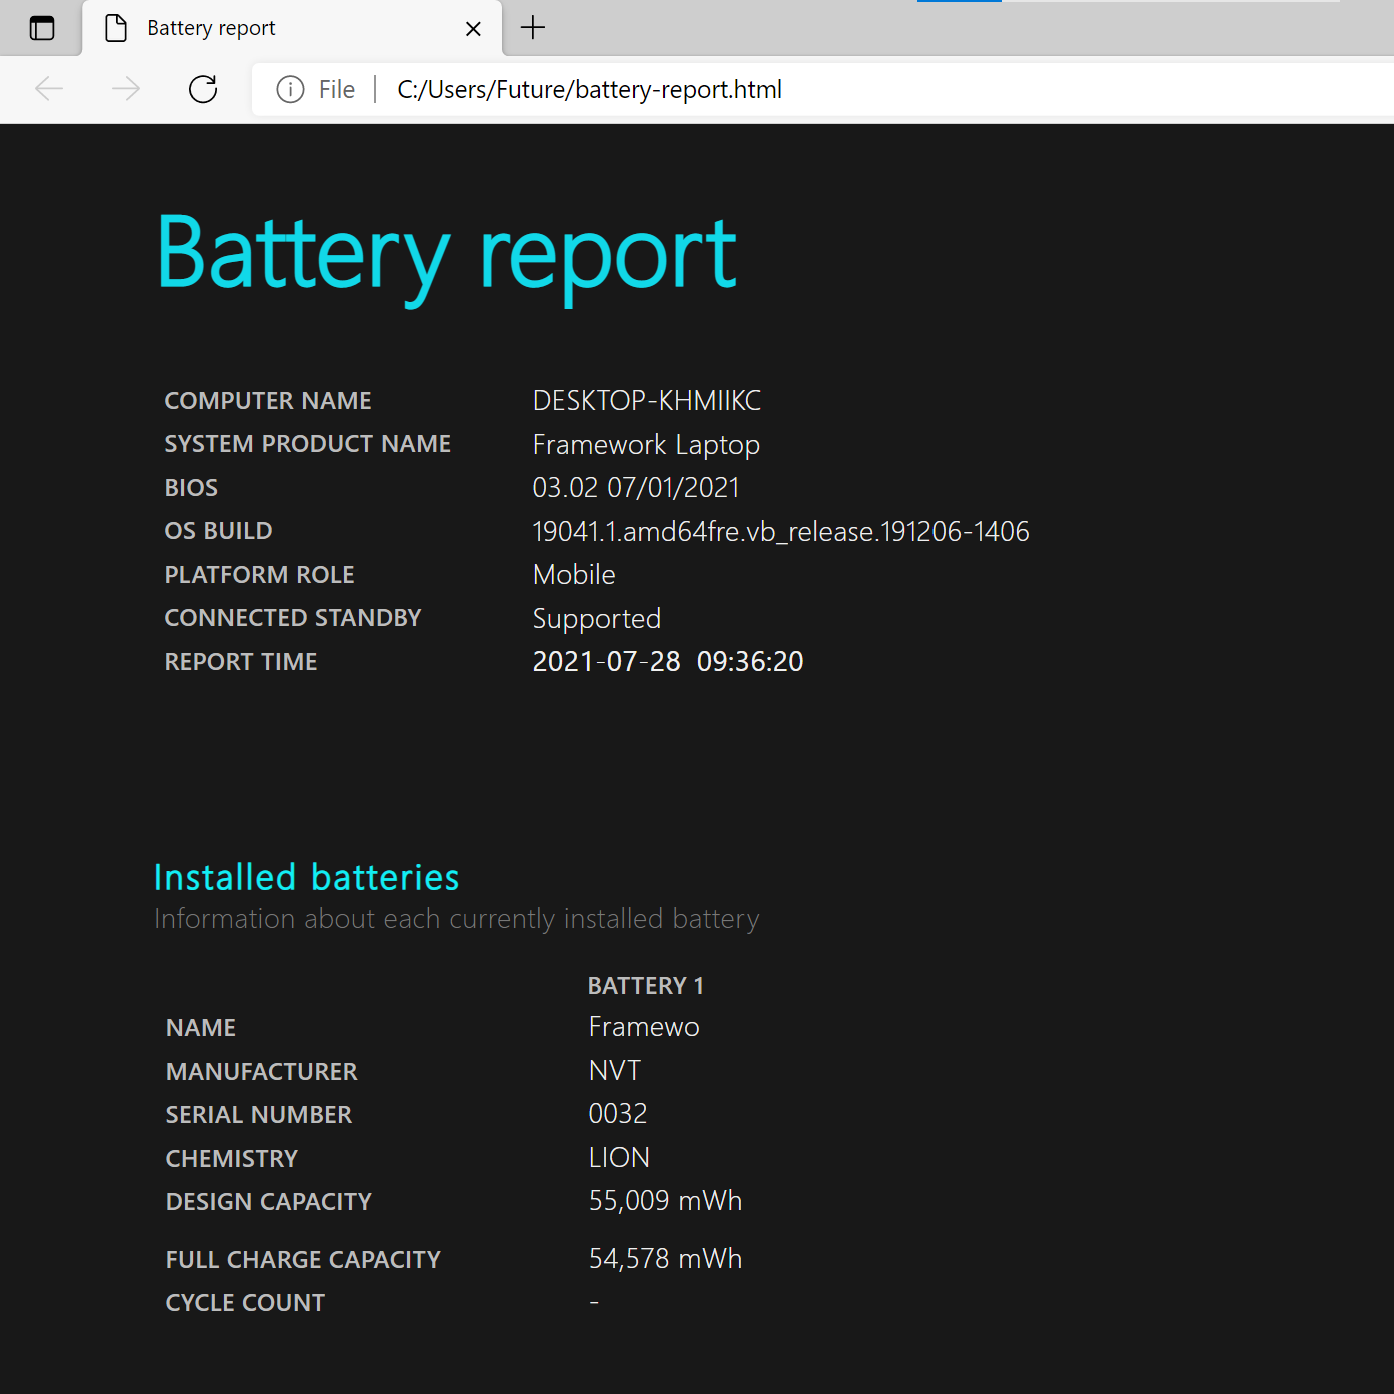
Once you have a copy of your Windows laptop’s battery report, you should have all the information you need to diagnose the battery health of your laptop.
How to check battery health in Windows 10: What to look for
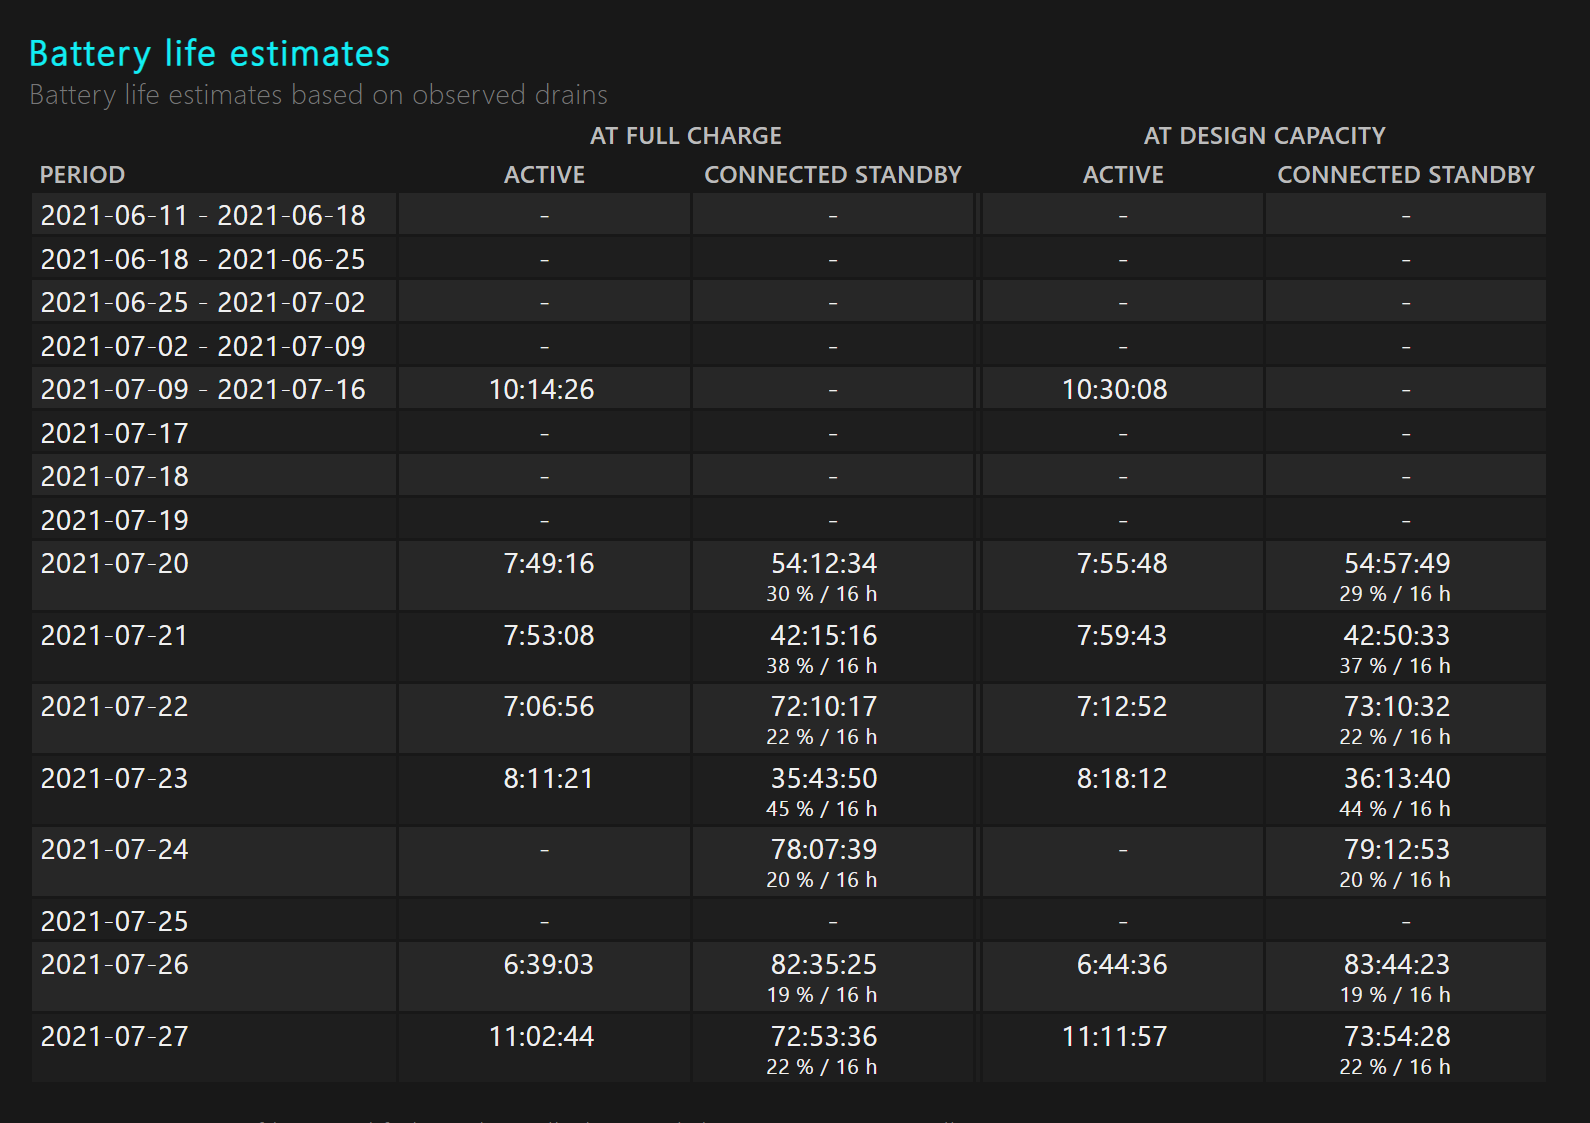
The quickest way to get a handle on how long your laptop’s battery can last is to skip down to the Battery life estimates section of your newly-created battery report. There, you’ll see estimates of how long your battery should last, based on how you’ve been using it in the past.
Keep in mind that these are imperfect auto-generated estimates, so you’re likely to see some strange math or confusing figures as you scroll down the list, especially if you’ve used the laptop erratically recently or have left it unused for long periods of time.
The most important things to pay attention to are the numbers under the Active heading: these are estimates of how long your battery would have lasted based on your laptop usage, formatted as hours, minutes, seconds.
Also, note that there are two columns of Active battery life estimates: At Full Charge and At Design Capacity. These are important because they estimate the difference between your laptop’s battery capacity now and when it was brand-new.
At Full Charge active time is an estimate of how long your laptop’s battery can last based on its current capacity, whereas At Design Capacity is an estimate of how long your laptop’s battery could have lasted when it was fresh from the factory.
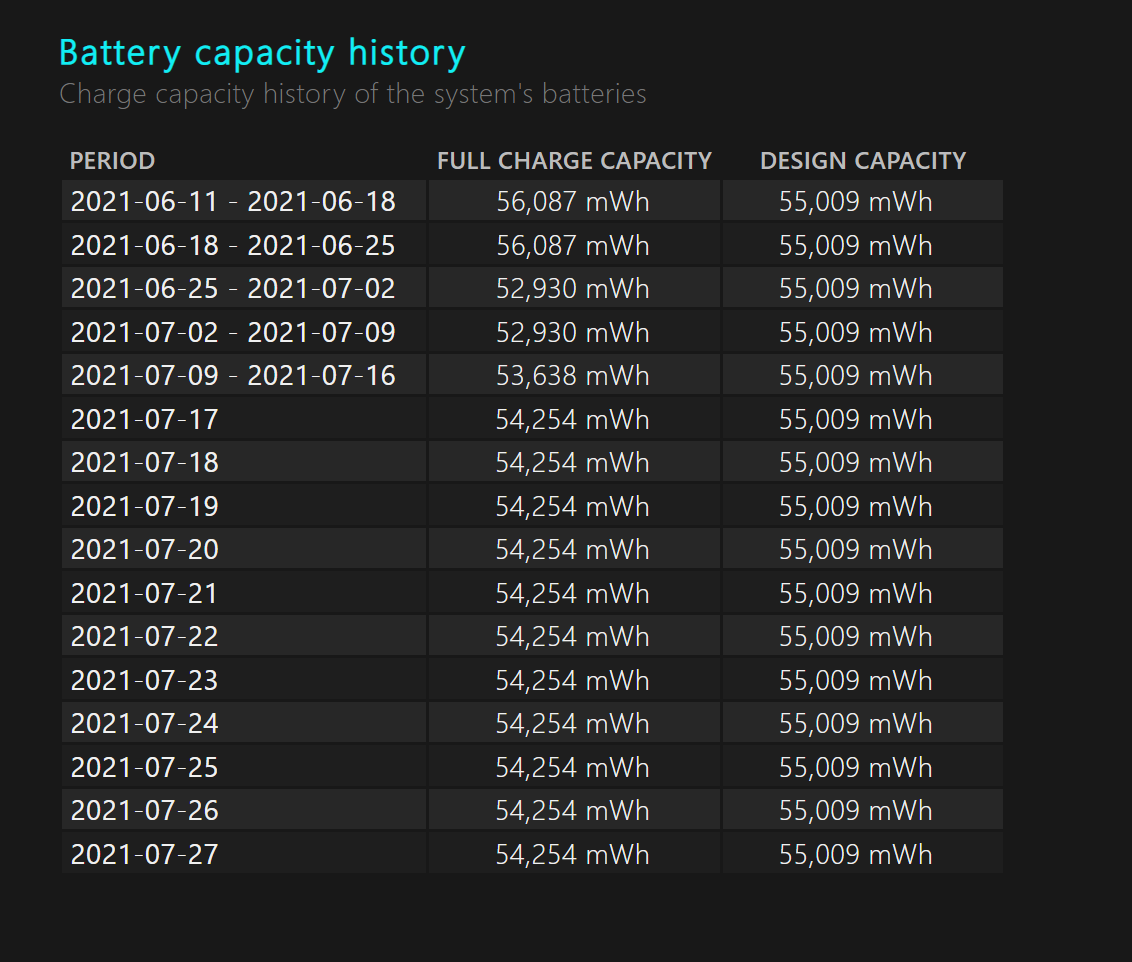
You can also get some useful insights from the Battery capacity history section of the battery report. You can find it midway through the report, and it provides a dated list of Full charge capacity measured against Design capacity.
Full charge capacity is a measurement of how much power the battery actually holds, and Design capacity is how much power it was designed to hold. Thus, over time you should see Full charge capacity diminish compared to Design capacity as your laptop’s battery ages and loses the ability to hold a charge. Once your laptop’s full charge capacity reliably drops 25%-50% below its design capacity, it’s probably time to start thinking about a replacement.
How to check battery health in Windows 10: Test the battery yourself
If the Battery life estimates section isn’t giving you a satisfying picture of how healthy your laptop’s battery is, you can test the battery yourself and use Battery Report to measure the results. Here’s how:
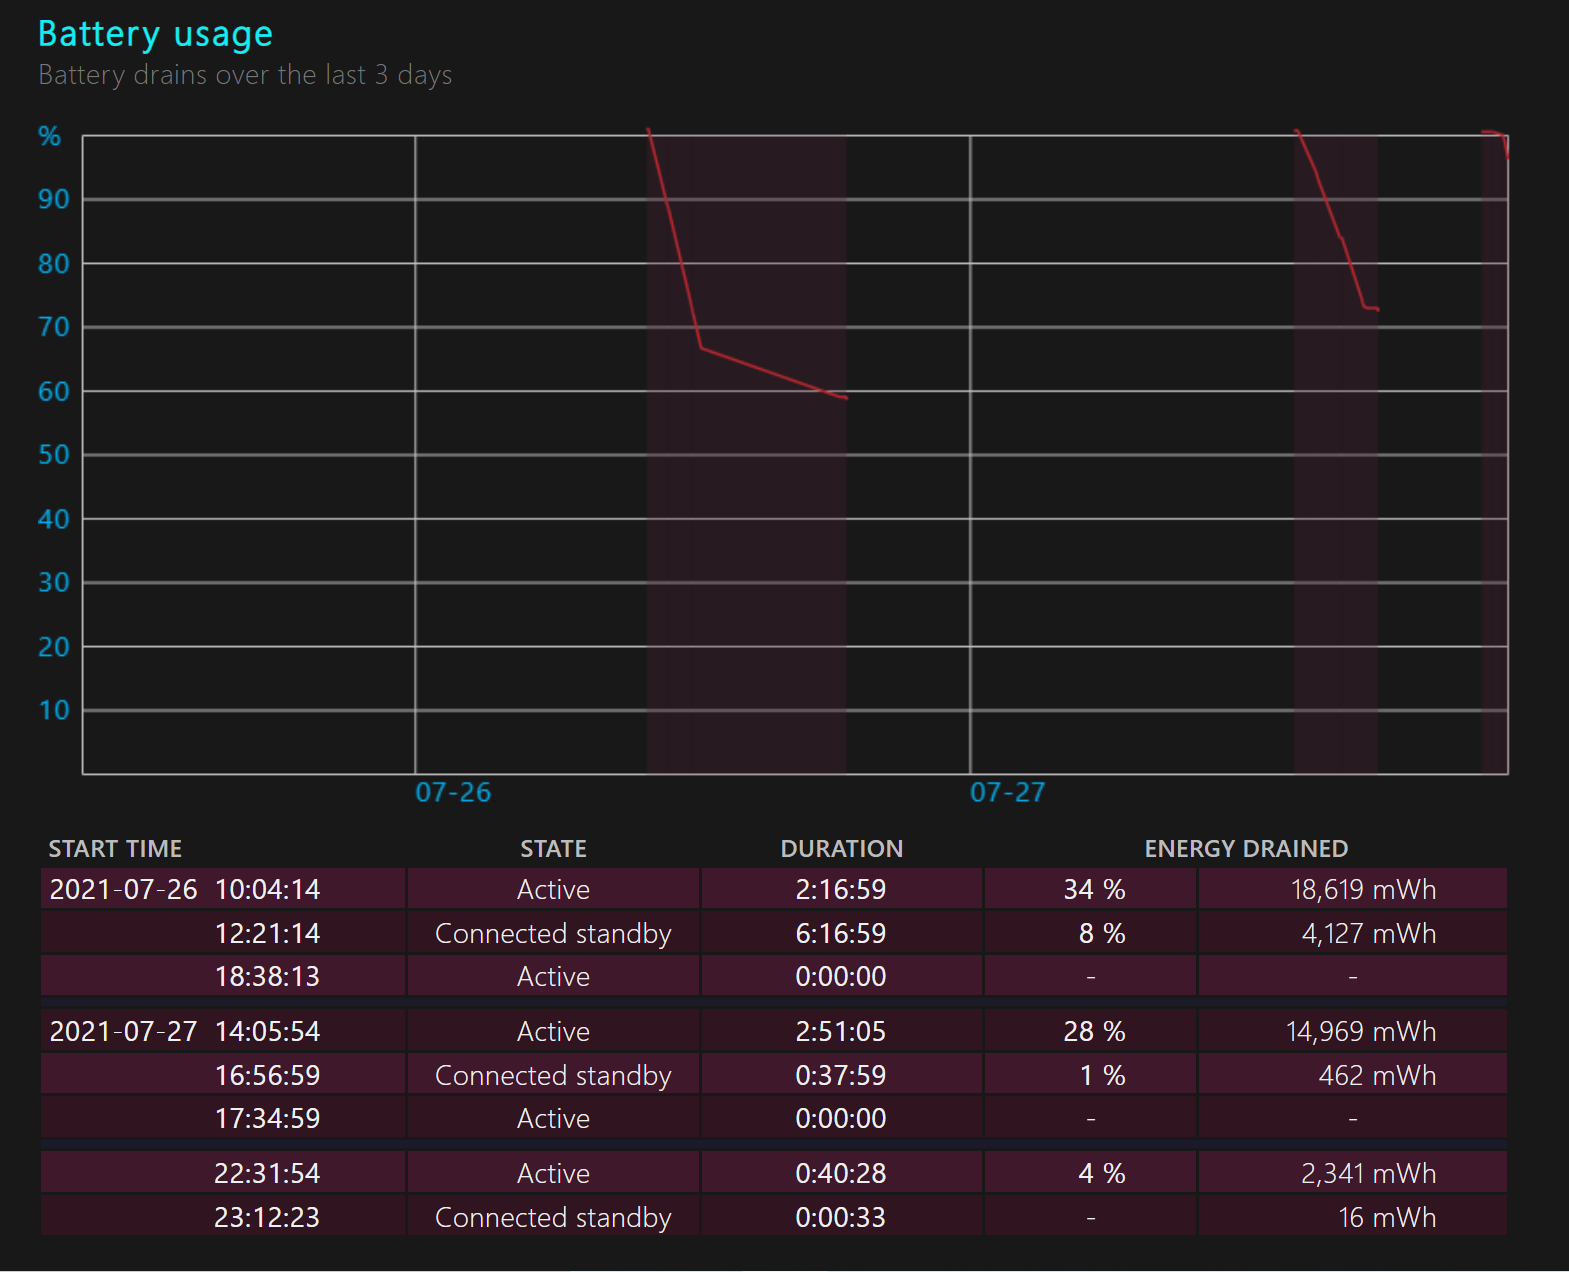
1. Generate a Battery Report (as outlined above) and look at the Battery usage section: see how it shows you a chart of how the battery was used over the past few days?
You can use this to measure exactly how long your battery can last on a full charge, but you’ll have to charge it up to full and then drain it straight down to zero without letting it hibernate or go to sleep.
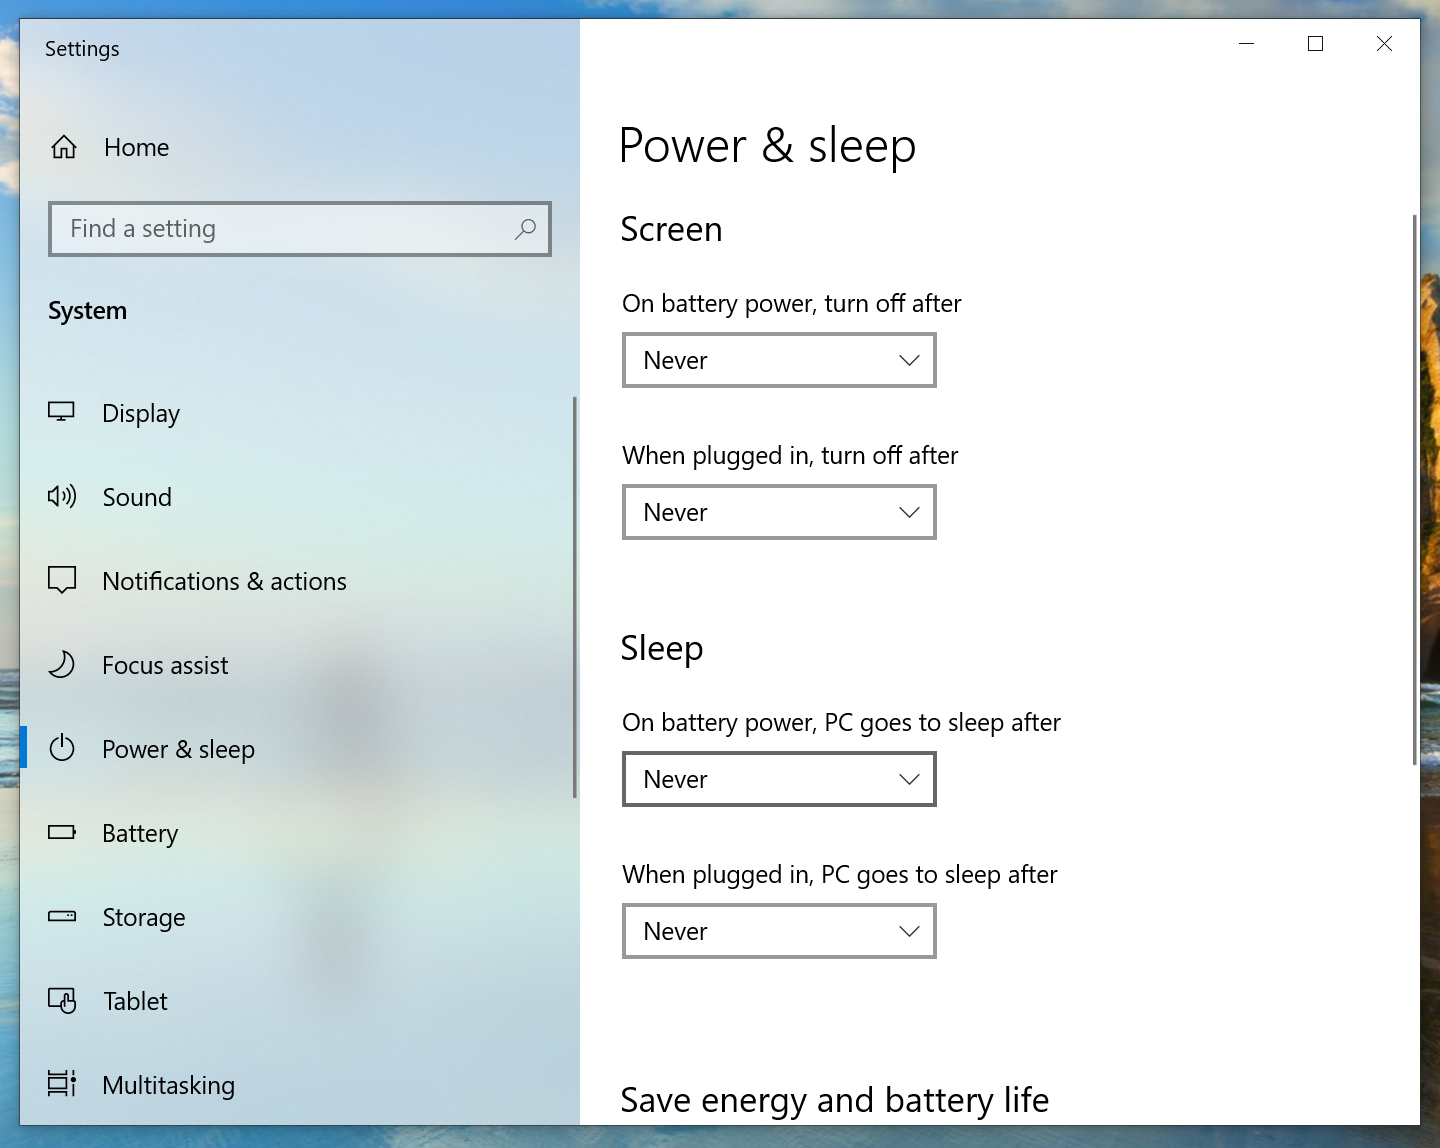
2. First, shut off as many of your laptop’s automated power-conservation features as you can find. Most notably, disable the sleep and hibernation features, which you should be able to find in the Power & sleep section of your System settings. The quickest way to find this is to type “Power” in the Start Menu.
3. Now come up with a plan of how you’re going to use the laptop continuously until it shuts off. Ideally you should just use it as you normally would all day, until the battery runs out, but this might not be practical — especially if your laptop still lasts 8+ hours on a single charge. Alternatively, you could mute the laptop and set it to play a 24-hour-long YouTube video, or launch into a game and leave it running all day.
4. Now charge your laptop up to full power and disconnect it from the charger, start your test of choice, and let the laptop run until it shuts off automatically. Once it’s off, connect it to power again, let it charge up until you can turn it back on, then generate another battery report using the process outlined above. You should see a new entry in the Battery usage section which reveals how long the laptop lasted (under whatever workload you gave it) on a full charge.
Performing these steps provides a good way to get an up-to-date idea of how long your laptop can last on a full charge.
You can run this test every few months to keep tabs on your laptop battery’s health, or try it with different workloads (a full day of web browsing and emailing vs. a full day of watching movies or playing games, for example) to get a better sense of which activities drain your laptop’s battery the fastest.
For all the latest Technology News Click Here
For the latest news and updates, follow us on Google News.
