How to connect two Macs without a network
A network is great, but what if you just want to connect two Macs and transfer gobs of information as fast as you can? Using a gigabit ethernet cable or a Mac with 802.11ac (Wi-Fi 5) or later wireless networking hardware, you can transfer data between two devices at gigabit per second rates, but you can do better than that!
Apple offers four built-in methods in macOS, none of which are obvious to set up. Each of them has different requirements, advantages, and tradeoffs. Once connected, you use the same tools to transfer information between two Macs as you would if they were connected to a network:
- SMB file sharing: In the Finder, choose Go > Connect to Server (Command-K) and click Browse. If the Mac doesn’t appear in the Network window, go back to Connect to Server, enter
smb://followed by the other device’s network-assigned or self-assigned IP address, and click Connect. (A self-assigned address means the computer couldn’t find a DHCP server, which assigns out addresses and provides a path to the Internet.) - Bonjour: A Mac connected with any method below should be discoverable via apps that support Bonjour.
- Direct app support: Some apps build in their own network services and should simply identify another Mac running client or peer-to-peer software.
Here are the four methods, from fastest to slowest.
Connect via Thunderbolt
Thunderbolt has long included a computer-to-computer mode that allows a 10Gbps connection. While that’s a fraction of its current 40Gbps data path for drives, peripherals, and displays, it’s speedy enough! (This method works with Windows and other computers that have Thunderbolt support, too.)
In my testing using a Thunderbolt 4 cable between two M1 Macs, I was able to get 4Gbps of sustained writes and 8Gbps of sustained reads using a speed-testing app, and 5Gbps in copying large files from one Mac to the other. Both rates are far above gigabit ethernet.
It’s vitally important that you have a USB-C to USB-C cable designed for Thunderbolt 3 or 4. Buy it from a company that has a good track record, such as Anker, Belkin, CalDigit, and Other World Computing, to name four of many. If you already own a USB-C cable, check that it has a lightning bolt symbol on plugs at both ends; it should also bear a 3 or 4, though Apple omits that, oddly enough. You don’t want a USB-C charge-only cable (typically unmarked ends) or a USB 3-only cable (typically a USB symbol and SuperSpeed+ or SS+, SS 10, or SS 20 label).
If you have one or two older Macs with Thunderbolt 2, you can use a Thunderbolt 2 to Thunderbolt 2 cable or a Thunderbolt 3 or 4 USB-C cable with a Thunderbolt 2 adapter on one end.
Here’s how to set it up:
- Connect the two computers with a cable via any of their Thunderbolt ports.
- Open System Preferences > Network and make sure Thunderbolt Bridge appears in the list of interfaces at left on both Macs. If not, click the + (plus) and select Thunderbolt Bridge to add it, click Create, and click Apply.
- With the bridge interface in place and the two Macs connected, you should see a yellow dot and Self-Assigned IP appear under the interface name.
- Note the address of each computer, which will be something that starts
169.254.like169.254.14.103. You’ll need that for SMB connections as described above.

To disconnect, simply unplug the Thunderbolt cable.
Connect via 1Gbps to 10Gbps ethernet
macOS can also automatically configure a network connection over ethernet between two Macs with the same outcome above: a self-assigned IP address. Some Macs—like the Mac Pro and Studio Mac—have built-in 10Gbps ethernet. Macs released in the last decade have 1Gbps ethernet, known as plain “gigabit ethernet.” To use 1Gbps ethernet, you need a cable rated as Category 5E (or Cat5E) or higher; for 10Gbps, at least Cat6. (If you want to use 10Gbps on a local network, you can get a 10 Gbps ethernet adapter for Thunderbolt 3 or 4 for a whopping $199.)
Open System Preferences > Network and make sure Ethernet appears in the list of interfaces at left on both Macs. If not, click the + (plus) and select Ethernet to add that interface, click Create, and click Apply. Connect the two Macs with the cable, and you’ll wind up as in step 4 above for a Thunderbolt cable.
You can connect with computers running other operating systems, as they generally also automatically create a self-assigned IP address and allow SMB and other networking services.
Performance should be up to 1Gbps with gigabit ethernet and match Thunderbolt performance with 10Gbps ethernet.
Create a Wi-Fi hotspot with your Mac
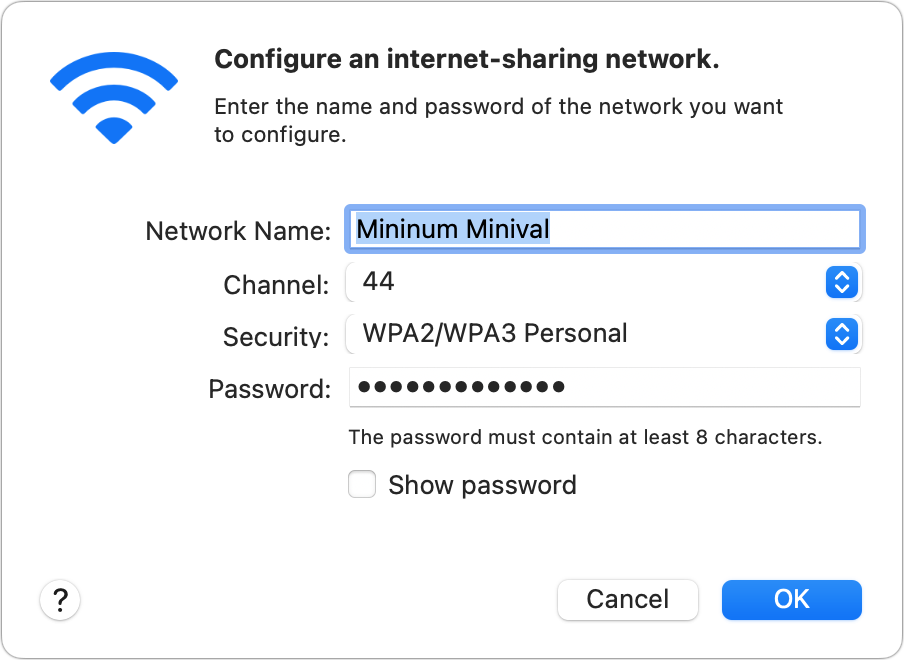
If there’s no Thunderbolt or ethernet cable handy and no Wi-Fi network nearby, you can use your Mac to create a Wi-Fi hotspot, once called a software base station. (Apple began including this feature decades ago.)

Read “How to share a Wi-Fi connection via macOS” on how to configure one Mac to offer such a network. You use System Preferences > Sharing rather than the Network preference pane. (Visit the Network preference pane and it shows Internet Sharing: On as the Network Name for the Wi-Fi adapter.) Your Mac also shows an upward-pointing arrow inside the Wi-Fi fan to indicate network sharing.

Once created, the Mac’s Wi-Fi network can be selected by any device with Wi-Fi. That includes Macs, gaming systems, Android phones, and anything else. Because this is a shared connection, the machine connected to your Mac will be assigned an IP address by your Mac.
With my Macs—an M1 MacBook Air and M1 Mac mini—I achieved between 100 and 200Mbps of throughput, about half what I could manage via a Wi-Fi network to a gigabit internet connection.
A Mac-created Wi-Fi hotspot is good in a pinch when no other network or cables are available, but an 802.11ac (Wi-Fi 5) or later Wi-Fi router can offer more throughput, often making it a better choice.
Disable the Wi-Fi hotspot by unchecking the Internet Sharing service in the left-hand list in System Preferences > Sharing.
Create a computer-to-computer wireless network
As the last resort, you can revert to an older wireless method once known as ad hoc. It’s out of date and lacks Wi-Fi security. Still, it has very little overhead because it’s a peer-to-peer connection—just make sure nobody is in range who could sniff your unencrypted wireless data.
Your maximum throughput will be relatively low. I measured below 100Mbps, even lower on average than with a Mac-created Wi-Fi hotspot.
Follow these steps:
- On both Macs, go to System Preferences > Network, select your Wi-Fi adapter in the left-hand list and click Advanced.
- Check “Show legacy networks and options” and click OK and then click Apply. (This is needed only in the last few releases of macOS.)
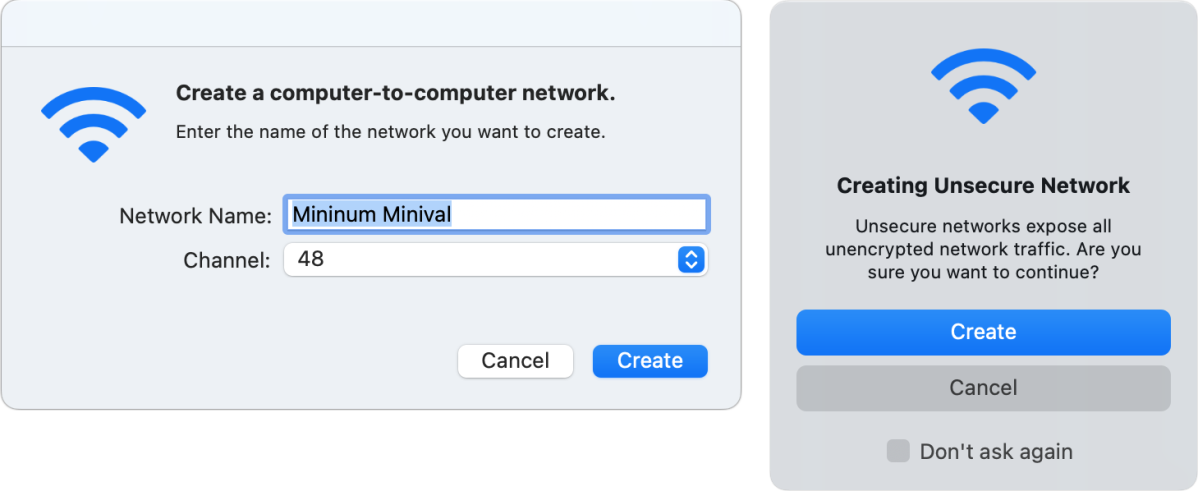
- In the Wi-Fi menu on the Mac on which want to create the network, select Create Network.
- Name the network and choose a high-numbered channel (36 or above), as that allows higher throughput, and click Create.
- When warned about creating an unsecure network, click Create.
- The icon in the Wi-Fi menu changes to show a tiny display within a Wi-Fi fan shape. Click the icon, and you see the network listed under Device.
- From the other computer, click the Wi-Fi menu and click Other Networks. The sharing Mac’s network appears under Device. Select it. (This may work with some non-Mac computers and mobile devices, too.)
- The connected Mac’s Wi-Fi icon will also change to the display-within-a-fan.

To disconnect, click the Wi-Fi symbol to the left of the network’s name on the Mac that’s sharing. Turn off the network on the Mac that’s sharing by clicking that Wi-Fi symbol under Device.
Ask Mac 911
We’ve compiled a list of the questions we get asked most frequently, along with answers and links to columns: read our super FAQ to see if your question is covered. If not, we’re always looking for new problems to solve! Email yours to [email protected], including screen captures as appropriate and whether you want your full name used. Not every question will be answered, we don’t reply to email, and we cannot provide direct troubleshooting advice.
For all the latest Technology News Click Here
For the latest news and updates, follow us on Google News.
