Five tips to fix a screen flicker
When TechRepublic first published a tutorial to correct flickering monitors, it was 2001. Since then, the computer world has changed significantly, and screens have come a long way. For example, CRT monitors — which were the norm back then — are much more sensitive and temperamental than the modern LED screens many of us use today.
SEE: Power checklist: Troubleshooting hard drive failures (TechRepublic Premium)
But, despite this and many other advancements in screen technology, flickering screens are still an issue. And because screens have evolved as device types have diversified, the quest for solving this kind of problem has grown more complex.
In this guide, we’ll offer you tips for troubleshooting your flickering screen across laptops, mobile devices, desktops and a variety of other device types.
Jump to:
Why is my monitor flickering?
There are many reasons why a screen could be flickering, including physical damages to hardware, software problems and bugs in specific applications. Changes in settings and malware can also cause your computer or mobile screen to perform poorly.
What to do if my display is flickering
Don’t lose hope if your device or computer screen seems to be out of play. There are several things you can do that might solve the problem quickly, whether you’re using a desktop computer, a connected monitor, a laptop, a smartphone or a tablet. The best troubleshooting route will depend on what device you are experiencing problems with as well as what operating system you are running.
In general, these are some of the best places to start when correcting a flickering screen. Remember that the higher the rate, the more energy the device will need to refresh the screen. When using smartphones, tablets and laptops, higher rates can deplete batteries more rapidly.
Check your cables
The first thing you need to check if you are using a monitor that connects to a computer is the cables. Whether you’re using VGA, HDMI, DVI or a display port cable to connect your monitor to a computer, it makes no difference; if the cable isn’t securely connected, there are going to be issues.
To start, you should check the cable at both the computer and monitor ends. If tightening it down or reconnecting it doesn’t solve the problem, try replacing the cable with a new one.
Laptop screens have cables that run hidden inside the frame and core of your computer. While you will not be able to rapidly fix this without professional help, you can identify if the cables are the problem.
To check these cables, start by turning your laptop on. Once the screen begins to flicker, slowly close and open the screen. If you notice changes to the flickering when you open and close the screen, that’s a good indicator that there are issues with the inner cables. Unfortunately, unless you have advanced computer hardware repair skills, you will need to take your laptop to a trusted repair shop to fix this issue.
Check the monitor refresh rate
Another important aspect of your device to check is the monitor refresh rate. The monitor refresh rate is the number of times the screen image is refreshed in a second, as measured in Hertz. If the refresh rate is too slow or otherwise under-optimized, you may experience issues with screen flickering and lag times.
While most users never adjust the refresh rates, it is a key component for how well your screen performs – it also affects battery life. Faster monitor refresh rates make it possible to rapidly move videos and images, as well as create a smoother motion experience when browsing or creating content.
Below, we’ll walk you through how to change the refresh rate on different devices and operating systems.
Change the refresh rate in Windows 10 and 11
- Select Start, then Settings and then System.
- Go to Display and then to Advanced display settings (Figure A).
Figure A
- Choose a new refresh rate (Figure B).
Figure B
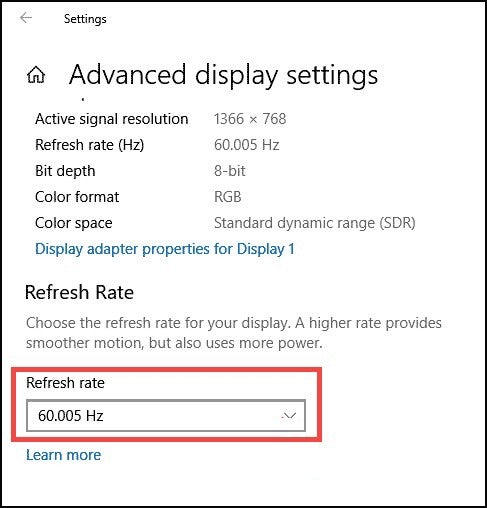
Note the refresh rates that appear; these will differ, depending on your display and what it supports. Some laptops and external displays will support higher refresh rates than others.
Change the refresh rate in Mac
- Choose the Apple menu, then System Preferences and then Displays.
- Select the Refresh Rate pop-up menu and choose a new refresh rate (Figure C).
Figure C
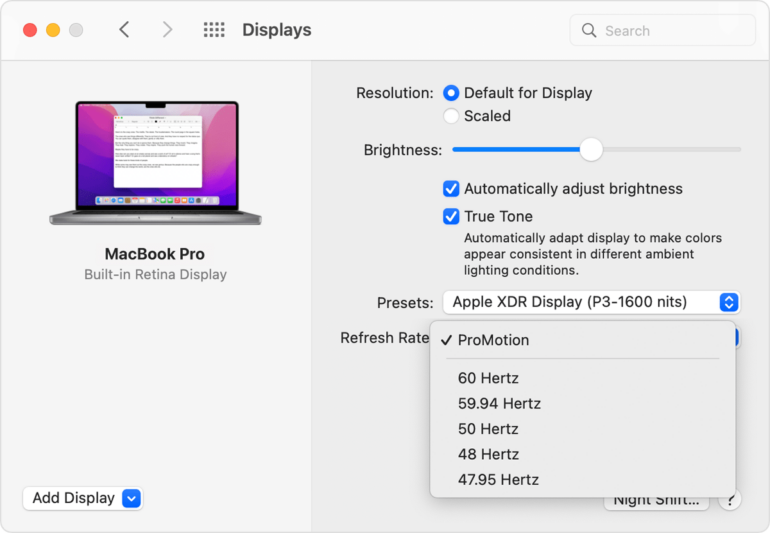
In macOS Catalina and macOS Big Sur, press and hold the Option key and select the Scaled button to display the refresh rate menu.
Change the refresh rate on Android smartphones or tablets
- Go to Settings.
- Scroll down and tap on Display.
- Scroll down again and toggle Flicker Prevention (Figure D).
Figure D
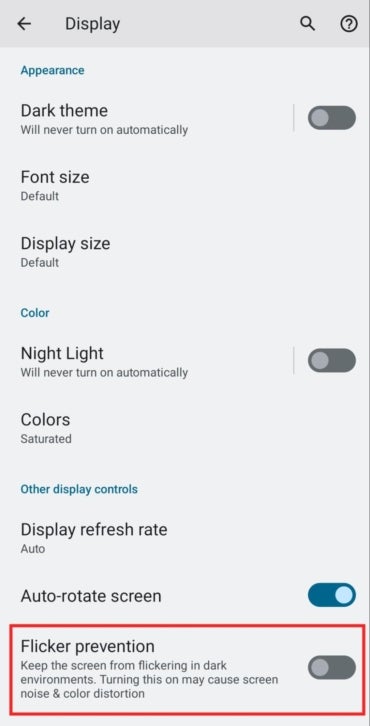
- If that does not fix the problem, return to Settings and then Display.
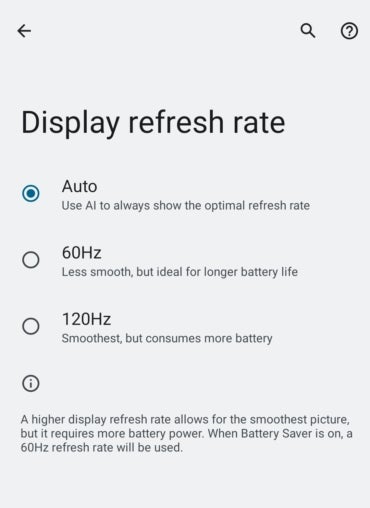
- Scroll to Display refresh rate.
- Choose between Auto, 60HZ or 120 Hz (Figure E).
Figure E
Change the refresh rate on an iPhone
These instructions work best for iPhone 13, 13 Pro, 14 and 14 Pro models.
- Go to Settings on your iPhone.
- Scroll down and tap on Accessibility.
- Select Motion under the Vision category.
- Scroll and toggle to turn on an option called Limit Frame Rate. This will automatically change the refresh rate from 120 Hz to 60 Hz.
Alternatively, you can use Low Power Mode on iPhone.
- Go to Settings on your iPhone.
- Scroll down and select Battery.
- Find the toggle for Low Power Mode and turn it on.
Flickering screens on laptops, smartphones and tablets may be caused by physical damage, like after the user has dropped the device. In hardware damage cases, only professional support can help you identify and solve the problem. Before taking your device to be fixed, you might want to check out a couple more of our tips.
Check the video card
Nearly all devices use a video card to properly display images. In desktop computers, this device needs to be properly positioned on the motherboard or it will cause a lot of problems, which could include a screen flicker. You can check your desktop computer video card by turning your computer off and opening the outer case.
You’ll want to find the video card and check if it’s properly connected; if it is, it should be firmly in place. If the card is seated on the motherboard properly but the issue persists, a faulty card is likely the cause of the problem. Testing this is easy, especially if the computer has an onboard GPU that you can plug into.
You can also test a new card. To do this, power down the computer, remove the video card and connect the monitor cable to the onboard card or a second video card you’ve replaced the old one with. If the problem persists, then the issue is not related to the video card.
Test the monitor
It’s always possible the monitor itself has gone bad, but before you consign it to the recycling pile, there are a few things you should do. Start by inspecting the monitor for physical damage and using the monitor’s onboard buttons to check for settings that may be causing the issue. If everything looks okay, it could still be a bad monitor.
To check this, unplug it and replace it with another monitor. If the new monitor is working properly, you’ve found your culprit; if the new monitor faces similar problems, you likely have an underlying issue with your computer or software.
More troubleshooting tips for Windows and Mac flickering screens
There are a couple of steps you can take to fix your Windows or Mac screen if the above steps have failed. Here are additional tips for troubleshooting your Mac and Windows devices.
Troubleshooting flickering Mac screens
Restart your Mac
Although this may seem all too simple, sometimes restarting your computer is exactly what you need to fix a flickering screen. A full shutdown is the best way to completely reset and refresh your Mac in order to test this method.
Update Mac apps
You can check macOS and device updates by opening the System Preferences app and selecting Software Update. To update your apps, go to the App Store and select Updates from the sidebar. Once the list of all pending app updates appears, select Update All.
Disable the True Tone feature
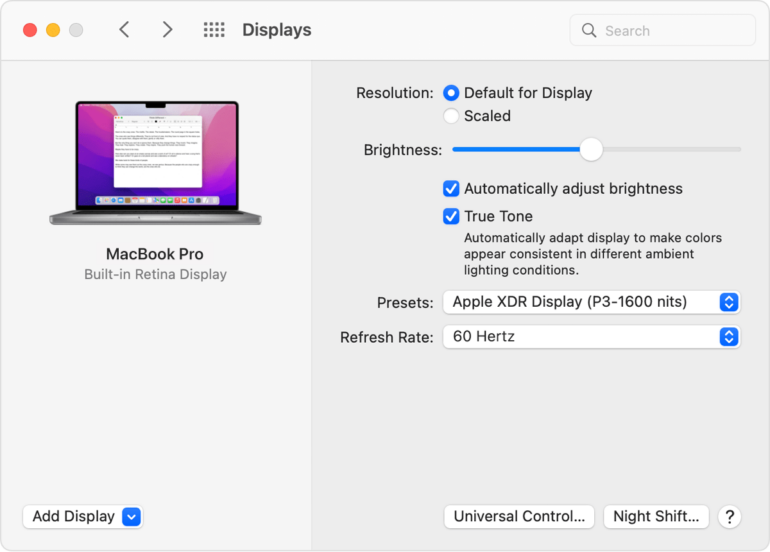
True Tone is designed to automatically correct images based on light levels, but this feature can cause a screen to flicker. To disable True Tone, go to the Apple menu, then System Preferences and click Displays. Now select your display and click on Display Settings. From here you can uncheck the True Tone checkbox (Figure F).
Figure F
Test your Mac with Apple Diagnostics
You have the option to test your Mac with Apple Diagnostics. This test will provide more detailed troubleshooting results and guidance to solve the issues your Mac may be experiencing. Learn how to run Apple Diagnostics at Apple Support.
Reset the NVRAM
The NVRAM — or PRAM — is memory Apple uses to store system settings in your Mac. These settings may be the cause of a flickering screen. You can reset the NVRAM on an Intel-based Mac, though not on Apple Silicon models.
To reset the NVRAM, shut down your Mac and turn it back on. Then, immediately press and hold these four keys at the same time: Option, Command, P and R. After 20 seconds, release the keys. Your Mac will restart with the original NVRAM settings.
Troubleshooting flickering Windows screens
Restart and check for updates
Simply restarting your Windows device can fix many screen flickering issues. If that fails, you should update your system with any suggested updates.
Use the Task Manager
Your device’s Task Manager can be used to see if an app or a driver is making the screen flicker. To do this test, press Ctrl + Alt + Delete, and the Task Manager will open. If the screen flickers but the Task Manager does not, then you have a bad driver or app problem; if the Task Manager flickers, you might have a malfunctioning hardware problem.
Roll back updates and get new display drivers
An incompatible driver or app can cause screen flickering problems. Microsoft’s official support page for Troubleshoot screen flickering in Windows has a detailed step-by-step on how to solve driver and app display problems like this.
Tips for flickering smartphone screens
If you are having problems with an iPhone or an Android smartphone, some of the steps listed above might work for you. Restarting your smartphone and ensuring your system is up to date is the best place to start.
You can also check into any outdated apps and display settings other than the refresh rate, including dark mode as well as day and night lights.
SEE: Computer hardware depreciation calculator (TechRepublic Premium)
As a last resort, you can back up your phone data and do a hard reset. Resetting a phone to factory settings will wipe it clean, but it will also restore the initial settings and remove any malware that may be causing the flickering.
Final thoughts
A flickering screen can be a real nightmare; fortunately, screens are more resilient than they were a couple of years ago. Additionally, there are numerous tricks, tips and steps you can take before even thinking about repairing your screen or replacing it for a new one. Regardless of what kind of screen you’re struggling with, this guide offers great initial resources for solving the problem.
Read next: 10 best antivirus software for businesses (TechRepublic)
For all the latest Technology News Click Here
For the latest news and updates, follow us on Google News.
