How to add a new development environment to Portainer
If you’ve deployed Portainer as a Kubernetes development platform and want to add a different environment, you’re in luck — the process is quite simple.
Recently, I outlined how to deploy Portainer to a MicroK8s Kubernetes cluster. The process is surprisingly easy and goes a long way to strip the complications from Kubernetes. That Kubernetes environment makes for a robust development process, but what if you also need to work with Docker? Thankfully, Portainer has many convenient Docker features that make deploying those containers a breeze.
SEE: Hiring kit: Back-end Developer (TechRepublic Premium)
With Portainer, you can add as many environments as you need to develop for Kubernetes or Docker within the same web-based GUI. In this tutorial, I’ll show you how to add a Docker environment to the same Portainer instance that was deployed using MicroK8s.
Jump to:
What you’ll need to add a Docker environment to Portainer
The only things you’ll need for this process are a running instance of Portainer and a user with sudo privileges. I’ll demonstrate this on the Ubuntu Server 22.04 operating system. If your OS differs, you’ll need to alter the steps for installing Docker and Docker Compose.
How to install Docker and Docker Compose
To begin, we must add the official Docker repository. We’ll first add the GPG key with this command:
curl -fsSL https://download.docker.com/linux/ubuntu/gpg | sudo gpg --dearmor -o /usr/share/keyrings/docker-archive-keyring.gpg
Next, add the Docker repository:
echo "deb [arch=amd64 signed-by=/usr/share/keyrings/docker-archive-keyring.gpg] https://download.docker.com/linux/ubuntu $(lsb_release -cs) stable" | sudo tee /etc/apt/sources.list.d/docker.list > /dev/null
From here, you’ll need to install the necessary dependencies with this command:
sudo apt-get install apt-transport-https ca-certificates curl gnupg lsb-release git -y
Install latest Docker Engine
Now, we can install the latest version of Docker Engine:
sudo apt-get updatesudo apt-get install docker-ce docker-ce-cli containerd.io -y
Next, you’ll add your user to the docker group with this command:
sudo usermod -aG docker $USER
To finish out this section, log out and log back in for the changes to take effect.
Install Docker Compose
Finally, we’ll install Docker Compose with this command:
sudo apt-get install docker-compose -y
With Docker installed, you’re ready to add the new environment.
How to add the Docker environment to Portainer
Now, you’re ready to add the Docker environment to Portainer. To begin, log in to your Portainer instance and click Environments under Settings (Figure A).
Figure A

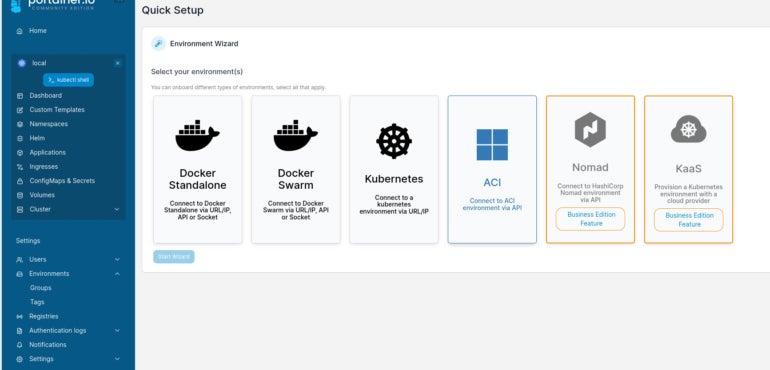
In the resulting window (Figure B), select Docker Standalone and click Start Wizard.
Figure B

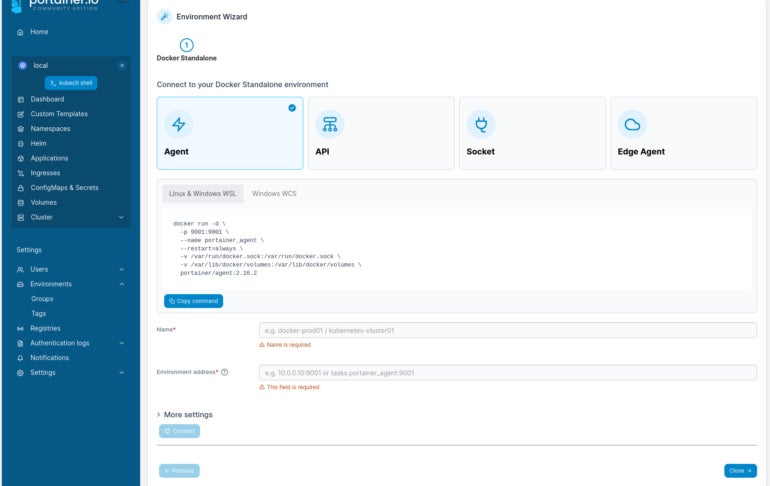
In the resulting window (Figure C), select Agent to reveal the Docker command you must run on the hosting server to add the Portainer agent.
Figure C

The command to do this is:
docker run -d -p 9001:9001 --name portainer_agent --restart=always -v /var/run/docker.sock:/var/run/docker.sock -v /var/lib/docker/volumes:/var/lib/docker/volumes portainer/agent:2.16.2
Once you’ve run that command, give the environment a Name and an Environment Address, and then click Connect. The Environment Address will be in the form of SERVER:9001, where SERVER is the IP address of the hosting server.
The connection should be made very quickly. If you then click Home in the upper-left corner, you’ll see your new Docker environment is ready to use (Figure D).
Figure D

Simplify your container development process
If you’re a platform engineer, developer or other user who is looking to simplify your container development process, I recommend using Portainer for Kubernetes and Docker. This web GUI has everything you need to not only perfect your container deployments but manage them as well.
Read next: The 12 best IDEs for programming (TechRepublic)
For all the latest Technology News Click Here
For the latest news and updates, follow us on Google News.
