
Overclocked Raspberry Pi being stress-tested to see if it stable Adrian Kingsley-Hughes/ZDNET
The engineers behind the Raspberry Pi have carefully balanced performance, power consumption, and heat generation.
Also: How to set up your first Raspberry Pi
But sometimes I like to squeeze a bit more power out of the hardware, and the Raspberry Pi 4 Model B gives us the scope to overclock the hardware to get more performance out of the board.
What is overclocking?
Chip makers are always balancing performance, power, and the amount of heat being generated, and as such tend to run their processor (CPU) or graphics (GPU) chips at a lower speed than they are capable of achieving.
Overclocking is a process where you tweak the settings of a device in order to unlock more of this performance, and push the chip harder than the default for that chip.
Why should I overclock my Raspberry Pi?
The bottom line is that you can unlock additional power and performance that you’ve paid for!
For most day-to-day usage, overclocking isn’t something that you will probably want to do to your Raspberry Pi, but if you’re planning harder and heavier workloads, then overclocking will help make things run a bit smoother. In this example here I’ve taken the speed of the Raspberry Pi’s processor from 1.5GHz to 2GHz — all by running a few commands.
Is overclocking a Raspberry Pi safe?
In a word, yes.
I’ve overclocked dozens of Raspberry Pi boards and not had a single problem.
While it is possible to have stability issues, and even push a Raspberry Pi to the point where the hardware could be damaged, here I’ll be showing you safe, approved methods of overclocking your Raspberry Pi that won’t void your warranty. We’re also going to take some additional cooling precautions to keep the system as cool as possible.
The Raspberry Pi also has a lot of built-in mechanisms to protect the hardware from damage, such as the ability to automatically slow down if it starts to overheat.
Before we start, some considerations
You can’t change the laws of physics. If you want to increase the performance of your Raspberry Pi by overclocking it, that’s going to also increase the power requirements as well as the amount of heat generated.
But we can take measures to help protect the Raspberry Pi from any downsides.
For the extra power requirements, I suggest running the Raspberry Pi using the official power supply, or from a decent power bank. This will give smooth, consistent power no matter if your hardware is idling or being pushed to the limits.
The other consideration is heat. While the Raspberry Pi does a really good job of keeping itself cool, it’s not a bad idea to improve the cooling. I’ve previously covered how to add small heatsinks to the chips and how to encase the Raspberry Pi in a fan-cooled heatsink.
Also: My 3 must-have Raspberry Pi accessories
For this demonstration, the Raspberry Pi I’m using will be fitted with heatsinks to get some extra cooling, and they seem to be doing a fine job of keeping the system in the right range (as we’ll see later). They’re quick and easy to fit, and only going to cost you a few dollars.
How to overclock your Raspberry Pi
Fire up your Raspberry Pi, and run the Terminal app. From here type the following command to update the Raspberry Pi (press ENTER at the end of each command):
sudo apt update
Next, run an upgrade by typing the following:
sudo apt dist-upgrade
That’ll take a while so grab a cup of coffee, tea, kombucha, or whatever it is that fuels your day.
When done, reboot your Raspberry Pi with this command:
sudo reboot now
OK, once your Raspberry Pi is back up and running, open Terminal again and type:
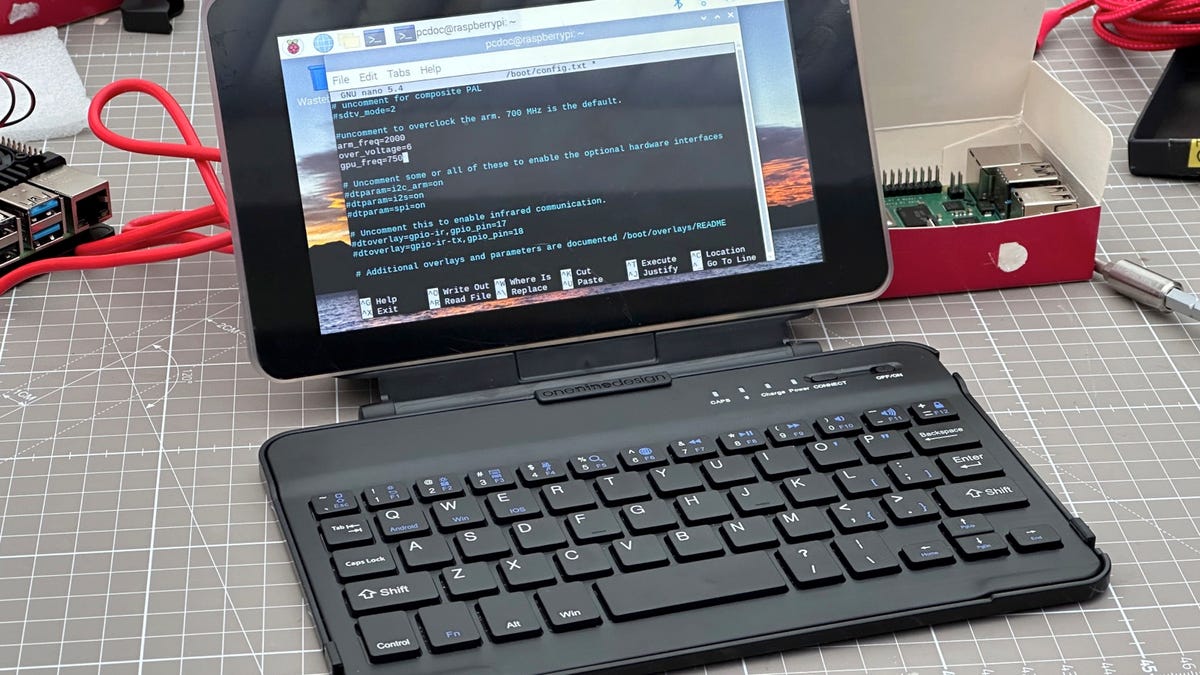
sudo nano /boot/config.txt
This opens the config.txt file in the Nano text editor.
In this file, scroll down until you fine the following line:
#uncomment to overclock the arm. 700 MHz is the default.
#arm_freq=800
Edit that second line as follows:
arm_freq=2000
This boosts the speed of the processor (CPU) in the Raspberry Pi 4 Model B from the default 1.5GHz to 2.0GHz.
We need to give the system a little more power with this line, which boosts the CPU and GPU voltage from the default 1.35V to 1.5V (the highest we can go without voiding the warranty of the Raspberry Pi).
over_voltage=6
We can also slightly boost the speed for the graphics processor (GPU) from 600MHz to 750MHz with the following line (it’s a small boost, but it’s free):
gpu_freq=750
That section of the config.txt file we’ve been editing should look as follows:
#uncomment to overclock the arm. 700 MHz is the default.
arm_freq=2000
over_voltage=6
gpu_freq=750
Edited config.txt file for overclocking Adrian Kingsley-Hughes/ZDNET
To save the file you’ve been editing, press CTRL+O followed by ENTER and to close Nano type CTRL+X.
Also: Raspberry Pi: Where to buy the hard-to-find latest model and its alternatives
Note: You can overclock your Raspberry Pi 4 Model B even more than this, but this is entirely at your own risk! These settings are the settings that I have found to give the best performance boost without causing crashes or possibly damaging the board.
In Terminal, type the following command:
sudo reboot now
This will reboot the Raspberry Pi and let you see if everything works.
If the system doesn’t work, reboot it manually by removing the power and plugging it back in.
If you still have problems, hold down SHIFT while rebooting the Raspberry Pi to force it to load without the overclocking and repeat step 2 above to check you typed everything properly.
The only way to really know if everything works fine is to push your Raspberry Pi to the limits. To do this we are going to use a program called Stressberry.
Installing Stressberry is easy – just type the following into Terminal (remember to press ENTER after each line):
sudo apt install stress
sudo pip3 install stressberry
Installing Stressberry on Raspberry Pi Adrian Kingsley-Hughes/ZDNET
To run Stressberry and save the data it collects in a file called out.dat, type the following command (a run takes about 5 minutes, so make sure you have the time):
stressberry-run out.dat
Once completed, you can get Stressberry to create a chart of the data it collected while running using the following:
stressberry-plot out.dat -o out.png
If temperatures stayed below the 85°C (185°F), you’re good. Here my Raspberry Pi peaked at about 84°C (183°F)
Results of Stressberry test Adrian Kingsley-Hughes/ZDNET
Since I have a thermal camera on my Ulefone Power Armor 18T, I can take the temperature of the system while it is being stressed by Stressberry.
Thermal image of Raspberry Pi while it was being stress-tested by Stressberry Adrian Kingsley-Hughes/ZDNET
It got hot for sure, but nothing to worry about.
This Raspberry Pi has been successfully overclocked.
For all the latest Technology News Click Here
For the latest news and updates, follow us on Google News.