How to reinstall macOS if Recovery won’t work
In the event of a serious problem with your Mac, you may need to reinstall your Mac operating system. There’s a simple way to do this using your Mac Recovery partition or via Mac Internet Recovery.
You can access the Recovery mode via the keyboard combination Command + R on an Intel-powered Mac, or by pressing and holding the power button on a M-series Mac. But what do you do if Mac recovery mode isn’t working or Command + R doesn’t work?
We’ll look at the best solutions below.
What is Mac Recovery?
A quick word on what Mac Recovery mode can do and how it works.
Most people don’t really think about their hard drives (well, SSD these days) in terms of partitions. They just see the whole drive as one thing. A hard drive is typically a single volume, but it is then split up into multiple areas, known as partitions or volumes. Think of your hard drive as the house, and the volumes as different rooms. (Read: How to partition a Mac hard drive or SSD, or create a APFS volume for more information.)
You’re used to only seeing one room in the house, the one which has your Desktop, Folders and Applications. But there are actually four separate sections, and one is used in extreme cases where you may want to completely reinstall the operating system macOS (previously known as Mac OS X).
Even if you completely wipe your Mac, and start again from scratch, the Recovery partition should still be there to make it possible to reinstall macOS, restore from your Time Machine backup, and repair or erase your hard disk. We look in detail at what you can do in Recovery mode in a separate article.
If you need to reinstall the operating system from scratch and the Recovery partition is missing, or for some reason you can’t access it, it’s a problem, but luckily there are solutions available.
Back in the days before Mac OS X Lion launched in 2011 there wasn’t a Recovery partition, instead you needed to have a physical disc with the software on it and an optical drive to insert it into. These days it’s rare to find a Mac with a optical drive, let alone find someone who has their original discs – not that Macs have shipped with install discs in recent times. We’ll look at what to do if you fit into this category later in this article though.
How to enter Recovery on an M1 or M2 Mac
Just in case you aren’t using the correct process, here is how to access Recovery on a M-series Mac (that’s one of the Macs sold since November 2020 which use an Apple processor rather than one from Intel).
- Turn off and shut down the Mac.
- Press the on button – and keep it pressed while the Mac starts up.
- When the Apple logo appears text will appear informing you that if you continue holding the power button you will be able to access startup options.
- Once a “Loading Startup Options” message appears you can let go of the Power button.
- Eventually you will be able to select Options > Continue and this will open up Recovery.
- Choose your language and click on Next.
- Wait for the internet recovery screen to load.
How to enter Recovery on an Intel Mac
If you have an older Mac with an Intel processor this is what you need to do:
- Turn off the Mac.
- Press the on button and press and hold the Command key and R on your keyboard while the Mac boots up.
- When you see an Apple logo or spinning globe you can stop holding Command + R.
- Eventually the Recovery Mode Utilities window will appear.
Why is Command R not working?
Still not entering Recovery mode? Here are a few reasons why you might find that Command + R doesn’t work and your Mac won’t start up in Recovery Mode:
- The number one reason why Command + R isn’t working right now is that your Mac is a M1- or M2-series Mac and you are not using the new process detailed above. There are lots of new ways to do things on M1 Macs.
- Your keyboard might be faulty, or your Mac may not be connecting to your keyboard via Bluetooth, in which case try using another keyboard–one that plugs in directly would be best.
- If your Mac is really old–as in so old it’s running Mac OS X Snow Leopard or older–it will not have a Recovery partition, the only way to reinstall the OS is to use the discs that shipped with the Mac.
- If your Mac is running a version of macOS older than Sierra (which launched in 2016) then you won’t have all the Recovery options available that you might read about.
- Something might have corrupted your Recovery partition, or you might have deleted it while replacing your hard drive or when installing Windows via Boot Camp (Intel Macs only).
How to enter Recovery if Command+R doesn’t work
Follow these steps to find out why Recovery mode isn’t working for you and get into Recovery mode.
Try again – and make sure you are using the right key combination

Foundry
The first thing to try is to restart your Mac and try to enter recovery mode again. It may work the second time.
Completely turn off your Mac and then make sure you press the right buttons when you start it up again:
- M-series Mac: Press and hold the power button.
- Intel Mac: Press and hold Command + R.
Check your keyboard

IDG
You should also check your keyboard is working (especially if it’s a Bluetooth keyboard). Try using a wired keyboard if possible. It is possible that you can’t enter Recovery because your keyboard isn’t working.
If you have a wireless Apple keyboard, for example, try plugging it directly into your Mac using the charging cable.
Try a different way to access Recovery mode (M-series Macs)

Foundry
If Recovery mode isn’t working on your M-series Mac then try fallback recovery mode. This is a little known feature for M-series Macs (detailed by Apple here) that replaces the Internet Recovery option found on Intel Macs.
You can enter Fallback Recovery Mode on an M1 or M2 Mac by double pressing the power button as detailed in the steps below:
- Press the power button.
- Then release the power button.
- Press and hold down the power button and wait for the “Loading Startup Options” message to appear before letting go of the Power button.
Fallback recovery mode gives you access to a second copy of the recoveryOS on the SSD of Macs with M1 or M2 chip. Apple says the second copy is there for resiliency.
Try alternative Recovery options (Intel Macs)
Foundry
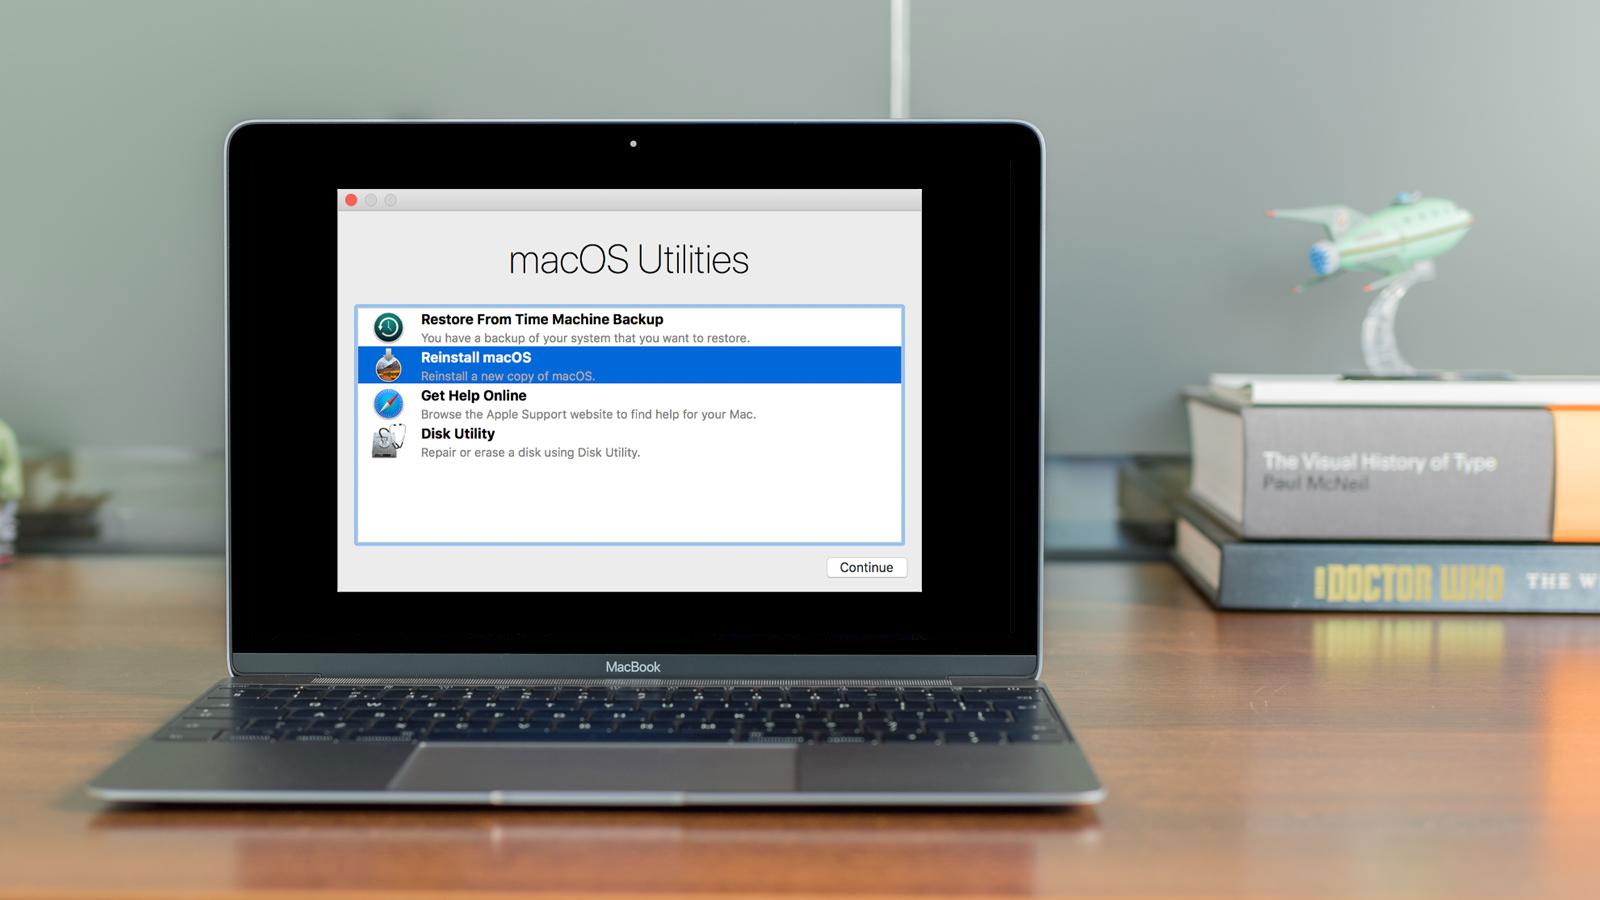
There are a few other ways you might be able to force your Mac to start up in recovery mode if Command + R isn’t working for you. Apple has a couple of other commands for Intel Macs that you could try:
You could use Internet Recovery Mode – an option that we will discuss in more detail below. This method will download a version of macOS from the internet, which might be a solution if you can’t access the Recovery partition on your Mac. We discuss Internet Recovery Mode in more detail below.
- Press Option/Alt + Command + R when you boot up to enter Internet Recovery Mode.
Once you enter this mode you will be able to access an Apple server to download the version of macOS. This will be the latest macOS compatible with your Mac. Note: If you aren’t running Sierra 10.12.4 or later, this will install the version that came with your Mac.
If you don’t want to install the latest version of macOS try this:
- Shift + Option/Alt + Command R (if you are running Sierra 10.12.4 of later) will install the version of macOS that came with your Mac, or the one closest to it that is still available.
If your Intel Mac has a T2 chip you can use this key combination:
- Option/Alt + Command + R will install the latest macOS on your Mac if you have a T2 chip.
Check if your Recovery partition is there/working
Foundry
Perhaps having tried the above and had no luck. Or maybe you got into Recovery Mode only for everything to freeze up.
It is possible your Mac’s disc is beyond repair and Recovery Mode inaccessible. In that case our article about How to recover data from a damaged Mac might be helpful.
It’s also possible that at some point you have accidentally deleted the Recovery partition.
Our next step is to check to see if your Mac has hasn’t got a working Recovery partition.
One indication that you don’t have a Recovery partition is if, despite pressing the key combinations listed above, the Mac boots up to your normal view, or you’re faced with a completely blank screen. In either case it’s likely you haven’t got a Recovery partition.
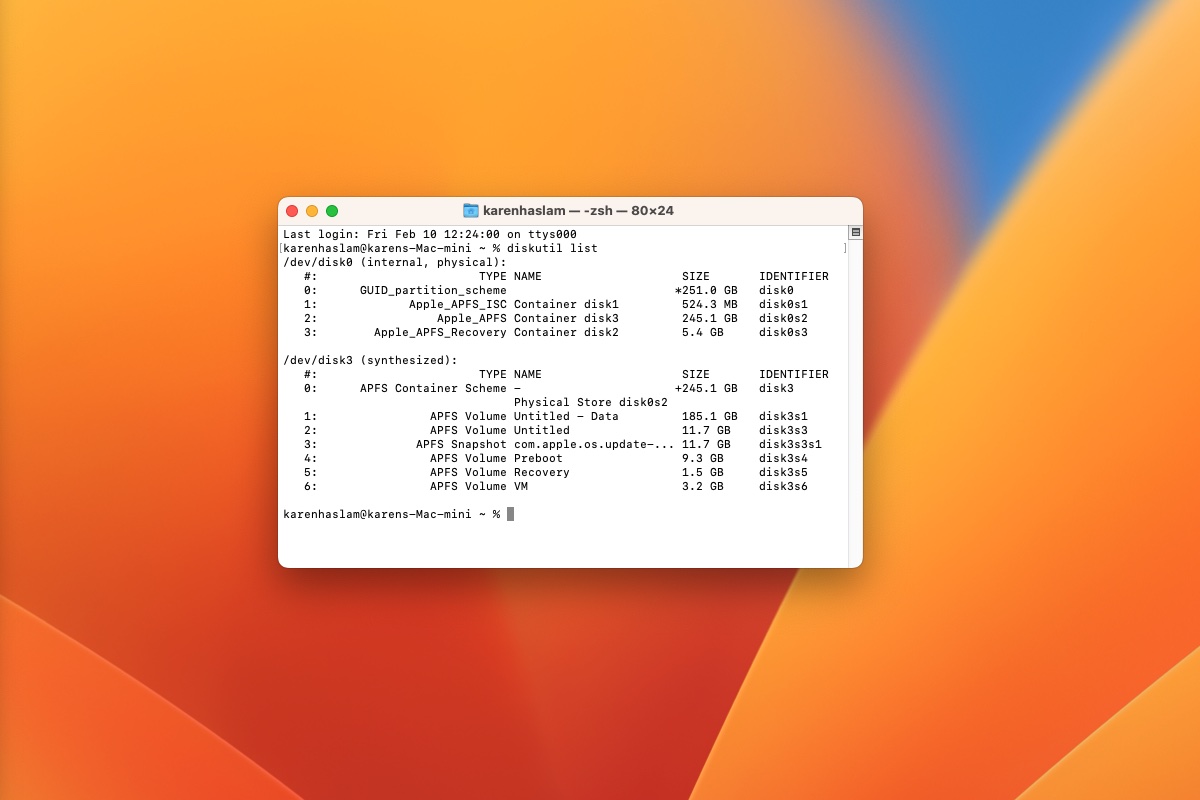
You can check Terminal to see if you have a recovery partition, here’s how to do that:
- Open Terminal.
- Type diskutil list.
- Press enter.
You should see a list of all the volumes and partitions on your computer (like the image above). The first drive (/dev/disk0) should have a partition.
Try to get the Recovery partition back

Foundry
You could try resetting your NVRAM to see if it makes your Recovery partition miraculously appear:
Reset your PRAM or NVRAM (Intel Mac)
- Shut down your Mac and hold down Command-Option-P-R during boot.
- Wait for the chimes and let go.
Reset your NVRAM (M-series Mac)
Resetting NVRAM isn’t really an option on M-series Macs. NVRAM does exist in M1 Macs, but it’s not the same. You could try the following, but it didn’t work for us.
- Open Terminal.
- Type NVRAM -c
Read more here: How to reset NVRAM on an M1 or Intel Mac.
If you have concluded that your Recovery Partition is missing, or doesn’t work and you’ve tried everything, there are still some more options. Next we will look at reinstalling macOS without Recovery.
Before we do that though, if it’s an option you should take time to back up up your Mac using Time Machine if you haven’t done so. This will enable you to restore all your files, folders and apps once you’ve reinstalled macOS.
How to restore a Mac with no Recovery partition

Foundry
It is possible to restore a Mac without a recovery partition, but it can be tricky (especially on older Macs). You have a few approaches available:
We’ll run through each option.
Use Internet Recovery to reinstall macOS
Foundry
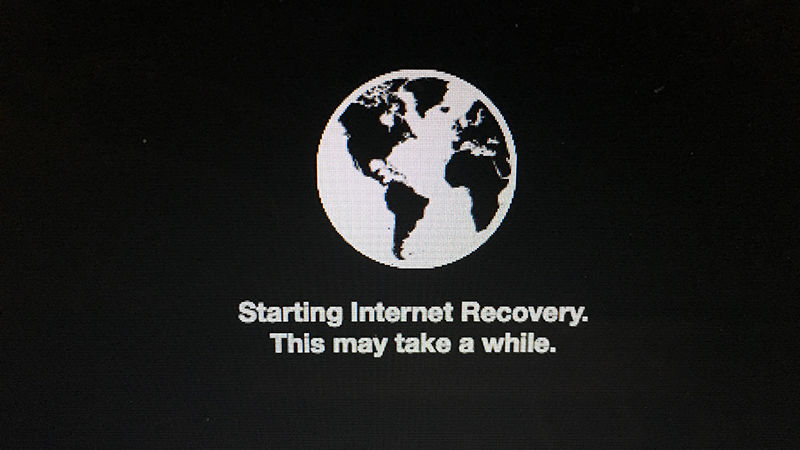
Here’s what to do if you haven’t got a recovery partition on your Mac and need to reinstall macOS (in fact, even if you don’t need to reinstall macOS you probably should, because a missing Recovery Partition is not a good sign).
The first approach is to use a feature called Internet Recovery. Newer Macs are able to boot directly from an internet connection, even with no Recovery partition available. Internet Recovery was added to macOS in Mac OS X 10.7 Lion in 2011, but older Macs may be able to get Internet Recovery Mode as a firmware update.
Here is how to use macOS Internet Recovery:
On an Intel Mac
- Shut down your Mac.
- Hold down Command-Option-R and press the Power button. (On some Mac keyboards the Option key will be named Alt).
- Hold down those keys until you a spinning globe and the message “Starting Internet Recovery. This may take a while”.
- The message will be replaced with a progress bar. Wait for it to fill. Expect it to take a while…
- Wait for the MacOS Utilities screen to appear.
- Click Reinstall macOS and follow the installation process.
On an M-series Mac
- Shut down your Mac.
- Press and hold the Power button and wait for the Mac to start up. Don’t let go of the button until you see “Loading Startup Options”.
- Click on Options.
- The internet recovery screen should load.
If you have accessed Internet Recovery mode it might be a very slow process depending on your connection speed. When we experienced this problem we connected our Mac to the hub via an Ethernet cable (you may need an adapter, such as this Thunderbolt to Ethernet Adapter from Apple, $29/£29).
Create a macOS bootable installer on a flash drive
Foundry
If you can’t access Internet Recovery, then you are left with the option to create a bootable installer from a flash drive (at least 12GB in size). Note that this completely erases the USB flash drive, so be careful to remove any files from it first. We cover how to create a bootable installer for macOS here, but we’ll give an overview of the method below.
The simplest way to create a USB flash installer it to
use Terminal:
Open your Applications folder and look to see if you have the Install files for the version of macOS or Mac OS X you require. In the case of Sierra or High Sierra you’ll see: something like the example above.
If you don’t have the files read about how to get older versions of macOS or Mac OS X here.
When you have got hold of the installer for the version of macOS that you require, follow these steps:
- Attach your USB flash drive to your Mac.
- Open Disk Utility.
- Select the volume (under External) in the sidebar. The Volume is the top part, not the partition (which is underneath).
- Click Erase.
- Make sure it says “Untitled” in the Name field. Don’t change this. Click Erase.
- Open Terminal.
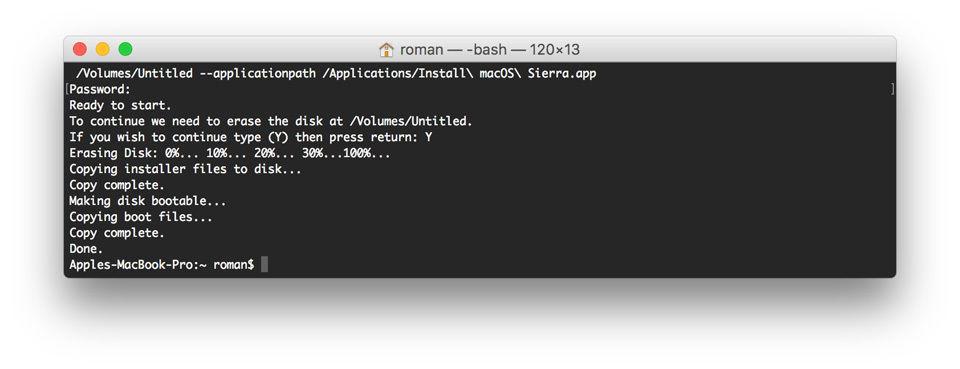
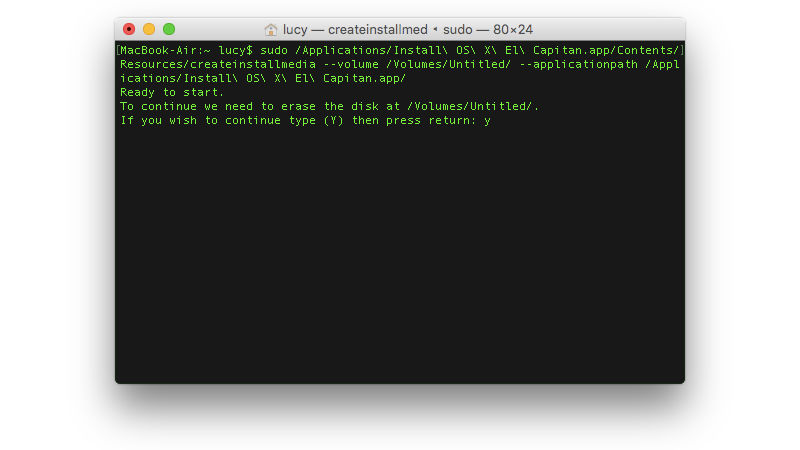
- Cut and paste the correct createinstallmedia text into Terminal (the code will depend on the version of macOS, so we suggest getting it from this article: createinstallmedia commands for versions of macOS. It will look something like the below image.)
- You’ll then need to enter your admin password. And then enter “y” and press Return. It will first wipe your flash drive, then turn it into a bootable installer.
- Expect to wait a while for the process to finish.
Install macOS from the bootable installer
Foundry
Now you can follow these steps to use the bootable installer:
- Make sure the bootable installer (USB flash drive) is connected to your Mac.
- Shut down your Mac.
- Hold down Option/Alt and press the Power button.
- The startup device list window should appear displaying a yellow drive with Install (software name) below it.
- Select it and press Return. Wait for the progress bar to fill.
- Select Disk Utility.
- Select the drive under Internal (your main hard drive).
- Click Erase.
- Give the drive a name; “Macintosh HD” is traditional but you can choose. Ensure that the Format is Mac OS Extended (Journaled) and the Scheme is GUID Partition Map.
- Click Erase.
- Click Done.
- Choose Disk Utility > Quit Disk Utility.
- Select Install macOS and click Continue.
- Follow the install macOS options.
- Select Macintosh HD as the installation disk, when presented, and click Install.
macOS will now be installed on your hard drive from the bootable installer. The whole process can take around half an hour. After this has finished you will have a new installation of macOS along with a Recovery partition.
You may get the message: “This copy of the Install [macOS name] application can’t be verified. It may have been corrupted or tampered with during downloading.” If so you need to adjust the date and time in macOS.
How to reinstall Mac OS X on an older Mac without Recovery mode
As we mentioned above, if your Mac is running Snow Leopard or older, it won’t have a Recovery partition. So if everything goes pear shaped and you need to reinstall your operating system what can you do.
If you have the original discs that shipped with the Mac, you should be able to use them.
If you don’t have those discs, you may be able to purchase them from Apple. Apple used to sell Snow Leopard until relatively recently, but it is no longer available here. Apple does however explain how to get older OS X versions here.
You can still buy a copy of Lion from the Apple Store here, but what you will receive is a download code, rather than physical discs. Once you have the Mac App Store on your Mac via Lion you will be able to get a newer version of macOS.
For all the latest Technology News Click Here
For the latest news and updates, follow us on Google News.
