How to use System Restore in Windows 10
It’s essential for all PC users to know how to use System Restore in Windows 10. When your computer starts crashing, displaying error messages or won’t even boot at all, a System Restore can prove to be a real lifesaver.
Introduced in Windows Me back in 2000, System Restore works by creating “restore points” that let you revert a misbehaving computer — including its system files and settings, installed programs, and the Windows registry — to a previous point in time when it was working properly.
System Restore used to create restore points automatically once a week, but in Windows 10 an instance is only created when a significant event occurs on your PC, such as an update, program, driver installation, or a system setting being changed. It’s also possible to create restore points yourself.
Strangely, considering how useful System Restore is, Windows 10 tucks the tool away in the System Properties section of the Control Panel, and doesn’t even turn it on by default. It now forms part of a broader feature called System Protection, which makes it even harder to find.
In our guide below, we’ll explain how to activate System Restore in Windows 10, how to create a restore point manually, and how to use a restore point to revert your PC to a properly working state when something goes wrong. We also cover how to run System Restore when Windows won’t boot.
How to use System Restore in Windows 10: Turn on System Protection
As mentioned above, System Restore is disabled by default in Windows 10. You might not realize this until you need to undo unwanted changes and find that you can’t. Here’s how to turn on System Protection, which includes the System Restore tool.
1. Type “system restore” in the Windows 10 search box and click “Create a restore point” in the results list.
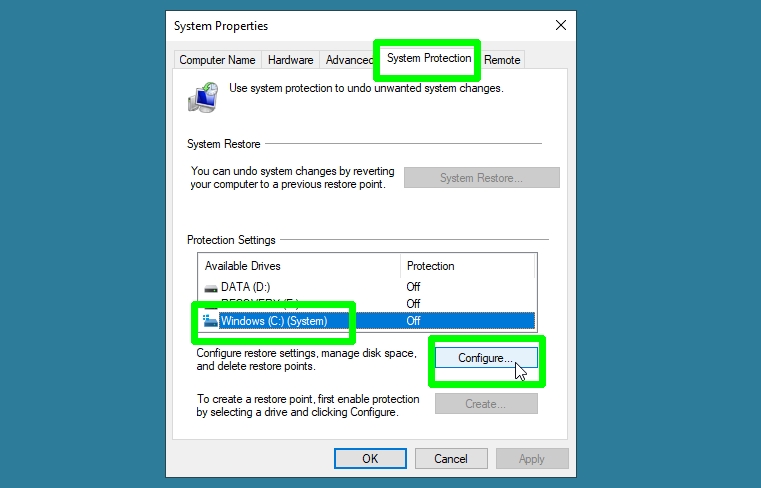
2. The System Properties dialog box will now open on the System Protection tab. In the Protection Settings section, select your main system drive, which is usually labeled “C:,” and click the Configure button.
3. Select “Turn on system protection” under Restore Settings. You can also adjust the maximum amount of disk space allocated to restore points.
However, as Windows 10 handles disk space usage automatically, you don’t need to worry about this unless you’re running out of space on your hard drive.
In the same box, you can also click Delete to remove old system restore points should you need to at a later date.
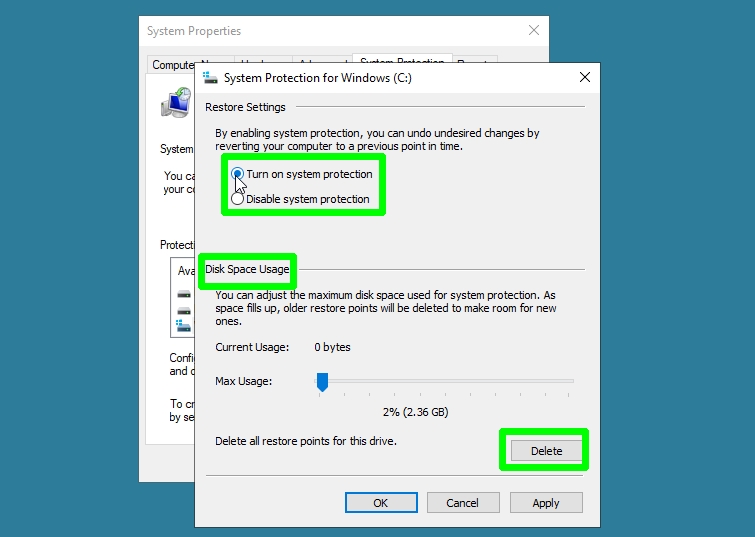
4. Click Apply, then OK to activate System Restore and close the System Protection box for your main system drive.
Windows 10 will now automatically create a restore point whenever a significant change is made to your system.
Repeat steps 2 and 3 for your other drives, if you want to turn on System Protection for those too.
How to use System Restore in Windows 10: Create a restore point
Although Windows 10 handles restore points automatically, you may also want to create a point manually before you make a major change to your PC. For example, you may plan to tweak system settings or open a potentially risky download. Here’s how to do it.
1. Repeat step 1 in the previous section to open the System Protection dialog box. Select the drive you want to create a system restore point for, and click the Create button.
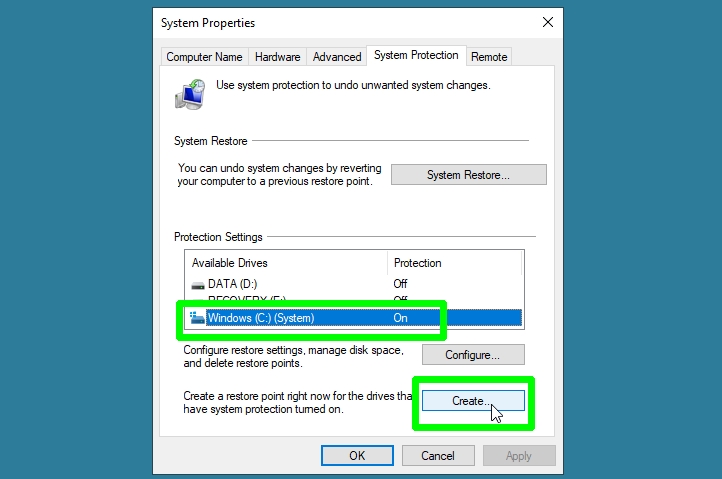
2. Enter a descriptive name for your restore point to help you identify it later. Windows 10 adds the date and time automatically. Click Create to continue.

3. System Protection will now create your restore point. This can take a while, depending on how much data it needs to save.
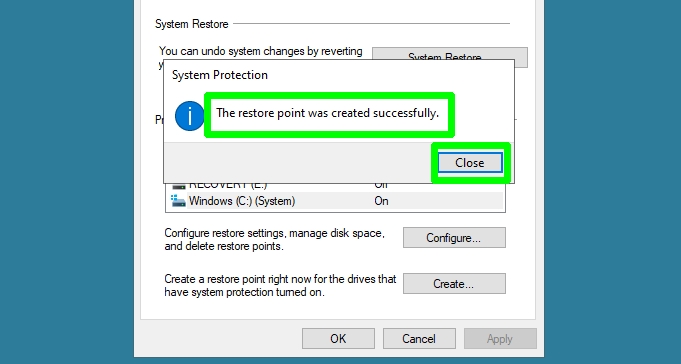
Once complete, you’ll see a message confirming that the restore point was created successfully. Click Close to exit.
How to use System Restore in Windows 10: Restore your system
Hopefully, you shouldn’t have to restore your system too often, but if your PC does start misbehaving, for example if it keeps crashing or certain features aren’t working, here’s how to undo problematic changes by restoring Windows to a previous state.
1. Open the System Properties box, in the same way we described earlier, and click the “System Restore” button on the System Protection tab.
If the option is grayed out, then sadly you don’t have any restore points available
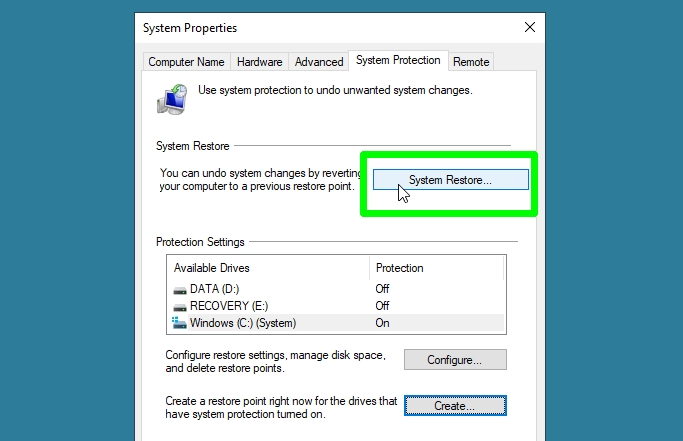
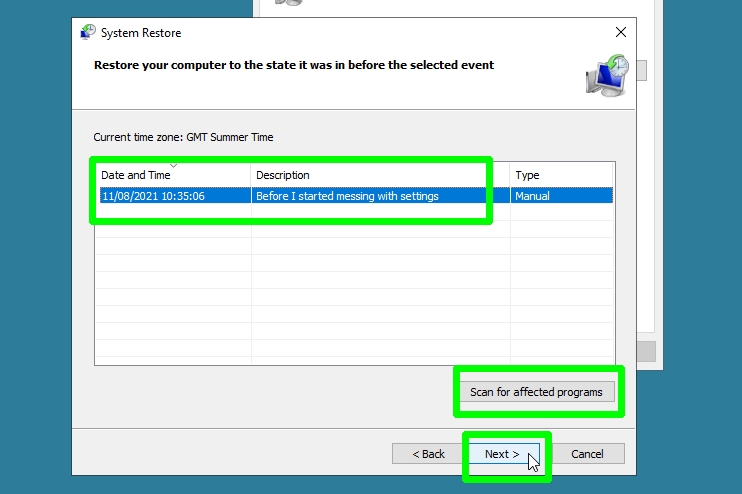
2. When the System Restore window opens, click Next to get started. Select the restore point that you want your system to revert to.
It’s also worth clicking “Scan for affected programs” to check which programs and drivers will be removed because they were installed after the restore point was created.
Click Next to continue.
3. Check and confirm the details of the restore point, then click the Finish button. This will return your system to the good working state it was when that point was created.
Note that System Restore will need to restart your PC to complete, so make sure you save any open files before you click Finish.
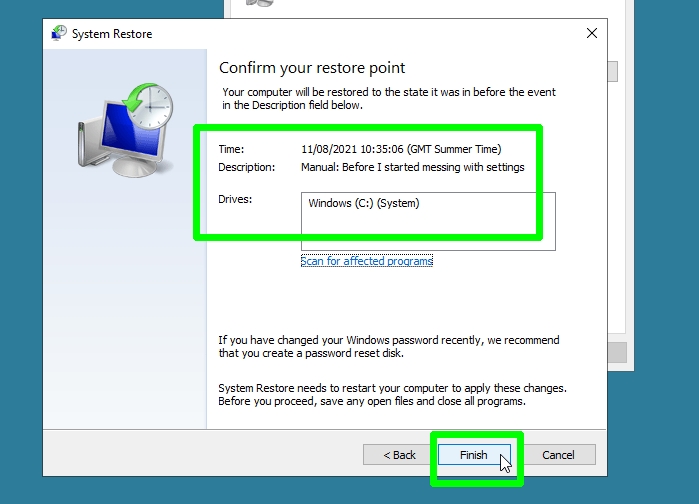
Additionally, System Restore can’t be interrupted while it’s in progress. It can take a long time, so it’s wise to do something away from your computer while you’re waiting!
How to use System Restore when your Windows 10 PC won’t boot
If your PC won’t boot properly to allow you to run System Restore, or crashes almost immediately, you can run the tool from Windows 10’s “Advanced startup options.” Here’s how to access System Restore using this method.
1. Start or restart your PC, then press the F11 key while it’s booting. Alternatively, hold down the Shift key while restarting your system.
A blue screen will appear asking you to “Choose an option.” Select “Troubleshoot.”
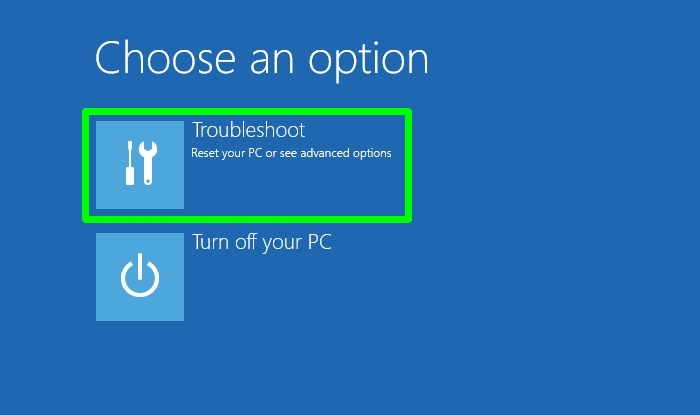
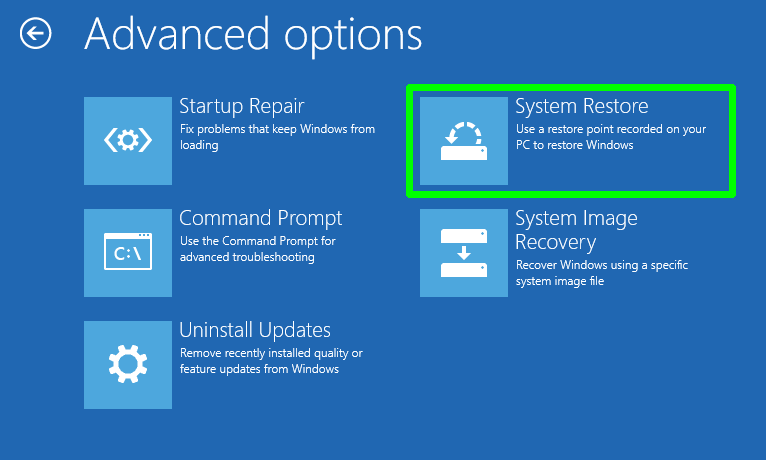
2. You’ll now be presented with the “Advanced options” screen. If not, look for a button with that name and click it.
Either way, select the System Restore option.
3. Choose your Windows account, enter your password, then click Continue.
This will open the System Restore wizard. You can now restore your PC to its previous working health, as described in the previous section.
For all the latest Technology News Click Here
For the latest news and updates, follow us on Google News.
