
Screen recorders for PCs come in handy when you want to save live streaming, film a tutorial, or share what you’re looking at with your friends. You don’t need a third-party app to record the screen on Windows 10, 11 laptop/ PC and Mac. Both machines come with a built-in screen recorder that lets you capture everything that is there on the screen and save it as an mp4 file for free. Apart from this, you always have the option to download the third-party app that lets you do much more than just record screens. Below we’ve outlined a few simple steps on how to record screens on Windows 10, 11 laptop/ PC and Mac, along with the best screen recorder apps that you can use. Take a look:
Screen recorder for Windows PC and Mac
Windows 10 and 11 have a built-in tool called Xbox Game Bar, while macOS has a QuickTime player to record screens on laptops/ PCs. There are several third-party apps as well that let you record screens on PC, but the one that we found particularly useful is OBS Studio. The app is compatible with almost every operating system out there, including Windows 7 and 8, macOS, and Linux.
How to record screen on Windows 10, 11 laptops/ PC
Xbox Game Bar: Windows 10 and 11 laptop/ PC users can use the Xbox Game Bar tool to record screens. The tool was designed for gamers to capture video, broadcast their gameplay online, and take a screenshot. Here’s how it works:
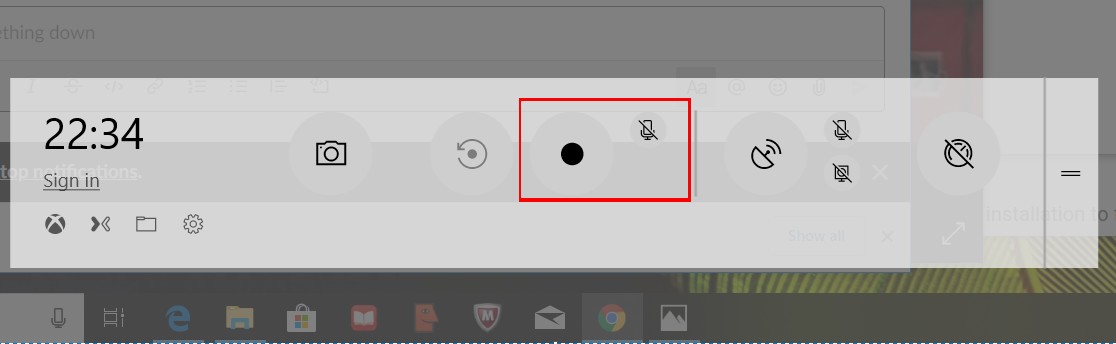
- Press Windows key + G to run Xbox Game Bar
- Choose the “Yes, this is a game” checkbox to load the Game Bar
- Open the app whose screen you wish to record
- Click on the start recording button or press Win + Alt + R to record the screen.
- Enable the microphone from the game bar, if you want to record audio as well
- Stop the recording by clicking on the red button
- That’s it! The screen recording in Windows 10 will be saved as MP4 on your device under the Videos folder in a subfolder called Captures. You can also access the recording from the Xbox app under the Game DVR menu
It’s worth mentioning that this screen recorder for Windows 10 laptops/ PCs only works on a handful of apps. Xbox Game Bar can’t capture the entire desktop and programs such as File manager. You can use a third-party Windows 7 screen recorder (stated below) to record the screen on Windows 10 laptop/ PC.
How to record screen on macOS laptop/ PC
QuickTime Player: Screen recording on macOS laptops/ PCs can be done using the built-in QuickTime Player. In addition to capturing what’s on your screen, the application lets you record external audio through a microphone. That said, it doesn’t let you record internal audio. Download the aforementioned OBS Studio app for that.
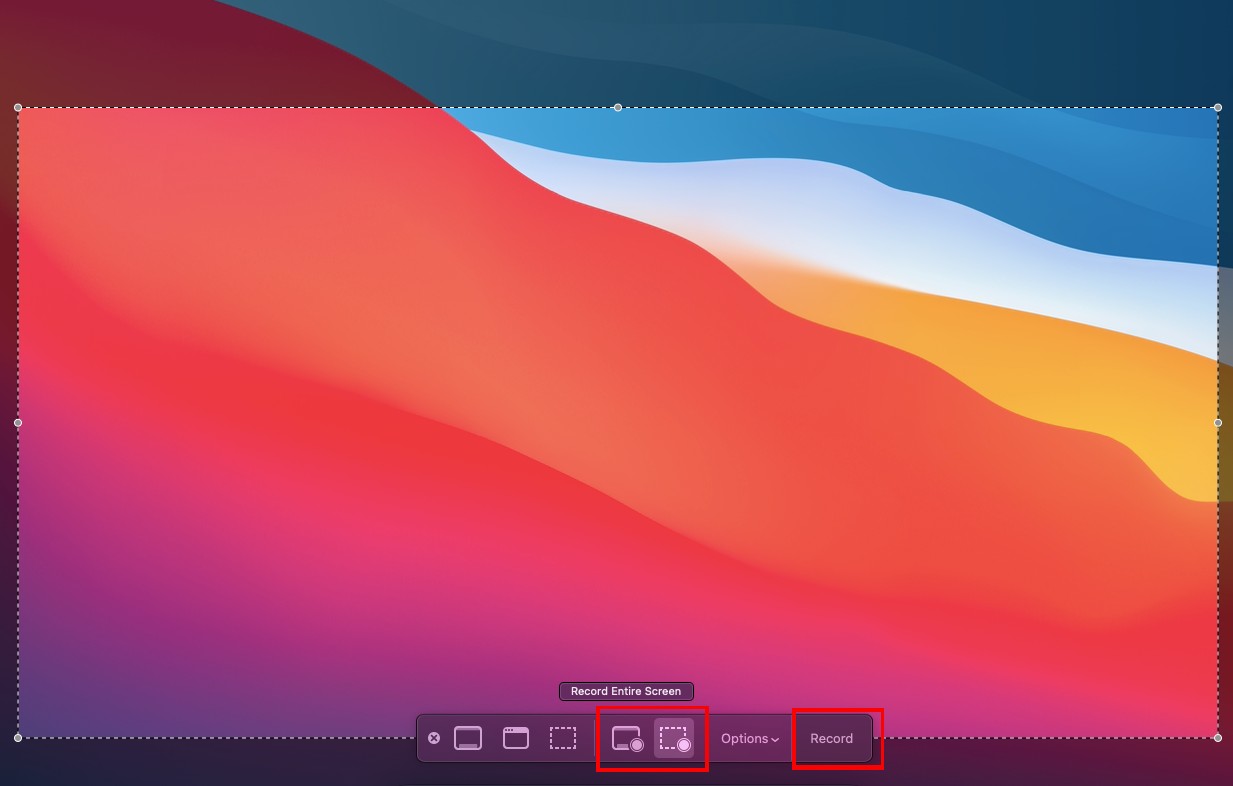
- To record screen in macOS using QuickTime Player, press Command + Shift + 5
- Alternatively, you can also open the QuickTime Player, then go to ‘Files’ and select ‘New Screen Recording’
- A control bar will appear at the bottom of your screen with options to record the screen as well as take a screenshot
- You have the option to record the entire screen or a specific portion. Additionally, go to ‘Options’ to set your preferences, enable microphone, set timer, and more
- When you’re ready, click “Record”. If it’s the entire screen, click anywhere to start recording
- Press the stop button in the right corner of the menu bar at the top of the screen or press Command + Control + Esc to stop recording. You can also press Command + Shift + 5 to view the screenshot
- The screen recording will be saved on the desktop or your preferred location
Much like Windows 10, the screen recorder for macOS desktops doesn’t cover all programs. Some apps, like Apple’s built-in DVD Player, will block you from doing any screen recording.
How to record screen on Windows 10, 11 and macOS laptops using a third-party app
OBS Studio: It’s among the nicest screen recorder apps for PC out there. Unlike Xbox Bar and QuickTime Player, OBS Studio works across program and you can sideload it on Windows 10 and 11, as well as macOS, Windows 7,8, and Linux laptops to record full screen for free. Apart from this, the app also lets you record voice via microphone while capturing the screen’s content.

- Go to https://obsproject.com/ in your computer’s web browser and download the OBS Studio setup file for Windows on your desktop
- Downloaded files are usually saved in Downloads –> go to the folder and double-click on the OBS Studio setup file
- This will prompt the installation window to open
- Install OBS Studio and launch it on your device
- The first time you run OBS Studio, it’ll ask if you want to run the Auto-Configuration Wizard. Click ‘Yes’ and follow the prompts.
- You’re now good to record screens in Windows 7. Click on the ‘+’ icon –> ‘Display Capture’ –> ‘Create new’ –> Enter a name for your capture –> Click ‘Ok’
- Start and Stop recording options will be in the lower-right section of the OBS Studio window
- The full-screen recording will be saved on your desktop. To view it, click ‘File’ in the menu bar and ‘Show Recordings’ in the resulting drop-down menu
How to record streaming videos on desktop
You can use the above-mentioned steps to record the screen in Windows/ macOS to record streaming videos on the desktop as well. Having said that, the steps won’t work on all streaming platforms. Additionally, you’ll not be able to record internal audio unless you turn on the external mic and turn up the volume, which won’t give you great audio quality, or download a third-party app like Soundflower or Audacity.
For all the latest Technology News Click Here
For the latest news and updates, follow us on Google News.