Windows 10 Display Settings superguide: How to adjust every feature
Your computer monitor is a major factor in deciding how good Windows will look on your PC. Indeed, even if your PC stays exactly the same, adding a higher-resolution monitor or a larger display can make a world of difference. To get the most out of your display, it’s important to acquaint yourself with your monitor’s onboard settings and calibrate it correctly. Equally important, however, is knowing your Windows 10 Display settings, and what all your adjustments will do.
In this article, we’re going to look at everything you can do to adjust your display in Windows 10. To play along, open the control panel and click the settings cog to open the Settings app. You can also hit the Windows Key + I. Next, click on System > Display. Now let’s dive in.
Settings > System > Display > Color
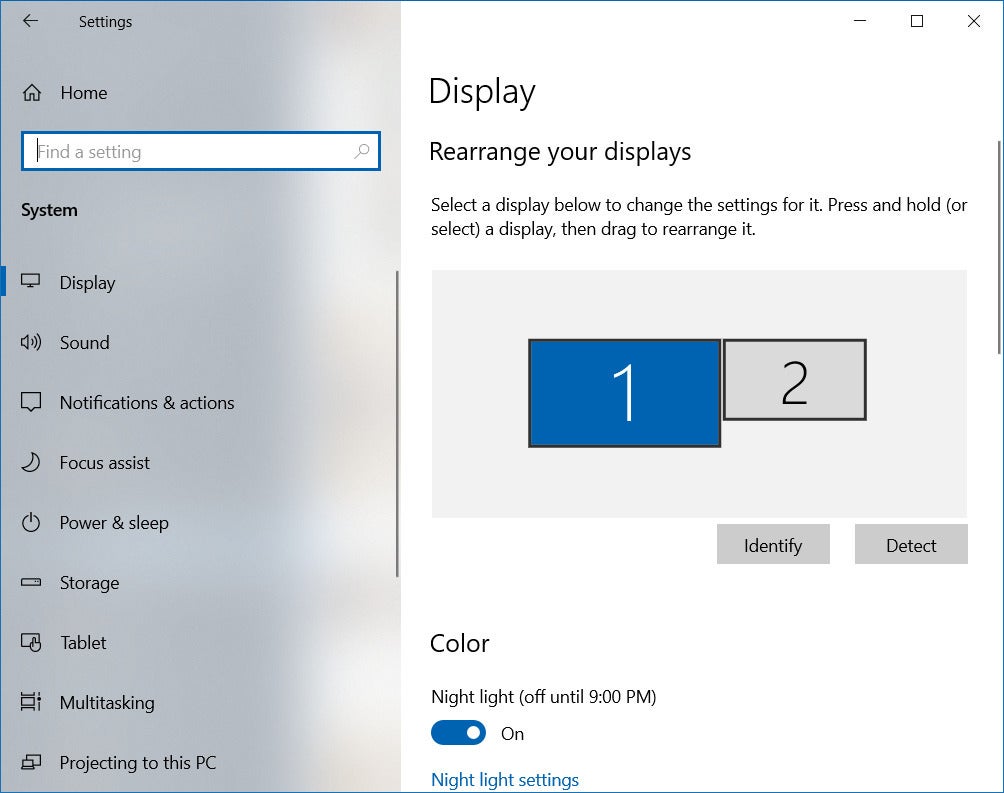
There’s only one option in this first section, and that’s for the Night light. The night light is supposed to filter the amount of blue light emanating from your display thereby allowing you to sleep better while still using your PC late at night. We won’t get into the arguments for or against this proposition, but if you want to use this option this is where it is.
IDG
There is a simple slider to turn the night light on or off. There’s also a Night light settings link underneath the slider. Clicking this will take you to a second screen where you can activate the night light by clicking Turn on now. Below that is a slider that allows you to adjust the “strength” of the night light. Turning it up reduces the amount of blue in the monitor and maxing it out gives the monitor a red filter. Turning it all the way down returns your monitor to its normal state. By default the night light strength is set to around 50 percent.
Finally, this second screen has a Schedule option. Flipping that slider button to On will let you customize the hours that the night light is active. By default, it’s automatically scheduled to be on from sunset to sunrise based on your location.
Otherwise, you can set your own hours by selecting the Set hours radio button. This gives you two simple options: Turn on, where you can set the time using AM/PM; and then Turn off, using the same interface.
To return to the main page of Settings > System hit the back button in the upper-left corner.
Settings > System > Display > Windows HD Color
If you have an HDR monitor this is where you can make adjustments to your display. First, you should see a slider button labeled Use HDR. Turn that on. If you don’t see this slider then you probably have to enable HDR in your monitor’s onboard settings. How you do that depends on your monitor’s manufacturer, so consult your manual for instructions on how to turn on HDR.
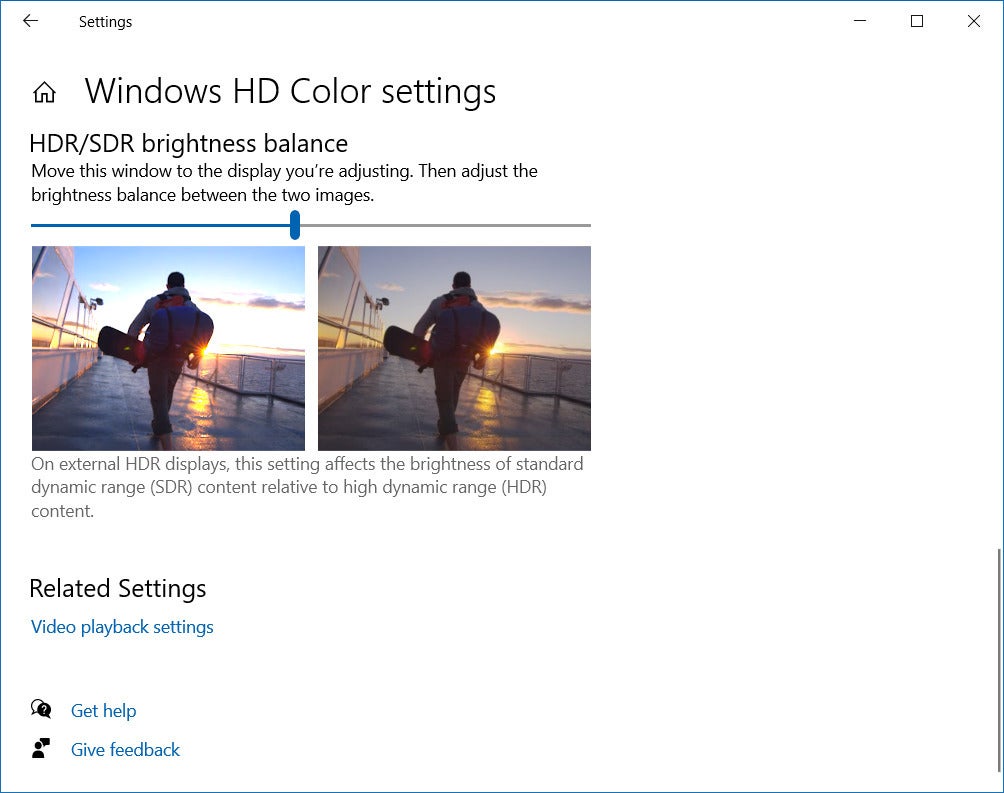
Once HDR is activated on your monitor, click the link Windows HD Color settings. This takes you to a second page with a number of options that only appear when HDR is active.

IDG
At the top is a drop-down menu to switch between displays if you have a multi-monitor setup. Then it shows a summary of your HDR options and what’s active. These include Stream HDR video, Use HDR, and Use WCG apps.
Then you have the Use HDR slider button, and then another slider button that says Stream HDR video. When available you can play streaming HDR video.
Next we have a preview video that gives you a sense of what HDR video will look like with your current settings.
Then there’s an HDR/SDR brightness balance option. This is another slider that lets you balance the brightness between the two images. Adjust this slider until you like the looks of both images.
If you want an in-depth look at how to maximize your monitor’s HDR potential, check out our tutorials on How to enable HDR in Windows 10 and Everything you need to know about HDR on your PC.
Settings > System > Display > Scale and layout
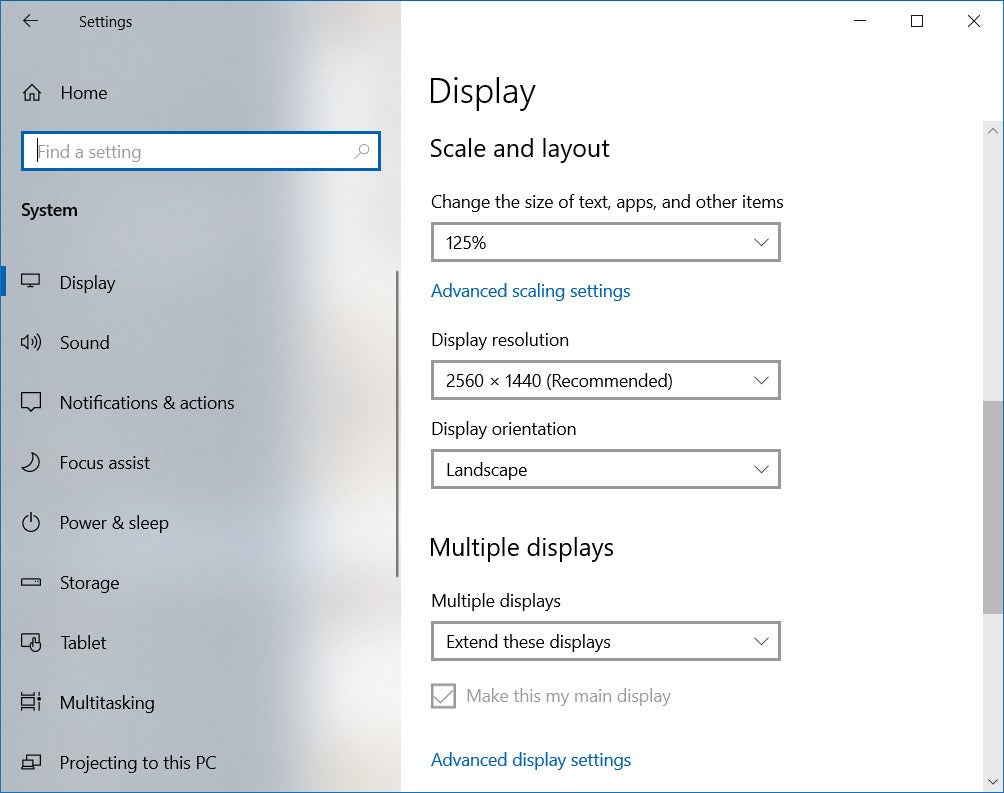
This is where you can adjust your display’s resolution, orientation, and scaling. At the top is a drop-down menu labeled Change the size of text, apps, and other items. We recommend using at least 125 percent scaling on 1080p display resolutions and higher to make it easier on your eyes, but find the scaling that works best for you.

IDG
If you want a scaling that’s between the presets click Advanced scaling settings. On the next screen you’ll see an option for Custom scaling where you can enter anything between 100 and 500 percent. Custom scaling is not recommended as it can really mess things up. If you need it, however, it’s here.
At the top of this screen there’s also a slider button to allow Windows to try and fix apps from being blurry, which can sometimes happen with scaling. Overall, however, Windows 10’s scaling presets work very well.
Going back to the primary Settings > System > Display window, there are also options for setting your display resolution. This should almost always be set to your display’s native resolution. Then below that is the display orientation for landscape and portrait mode options—landscape is the default.
Settings > System > Display > Multiple displays
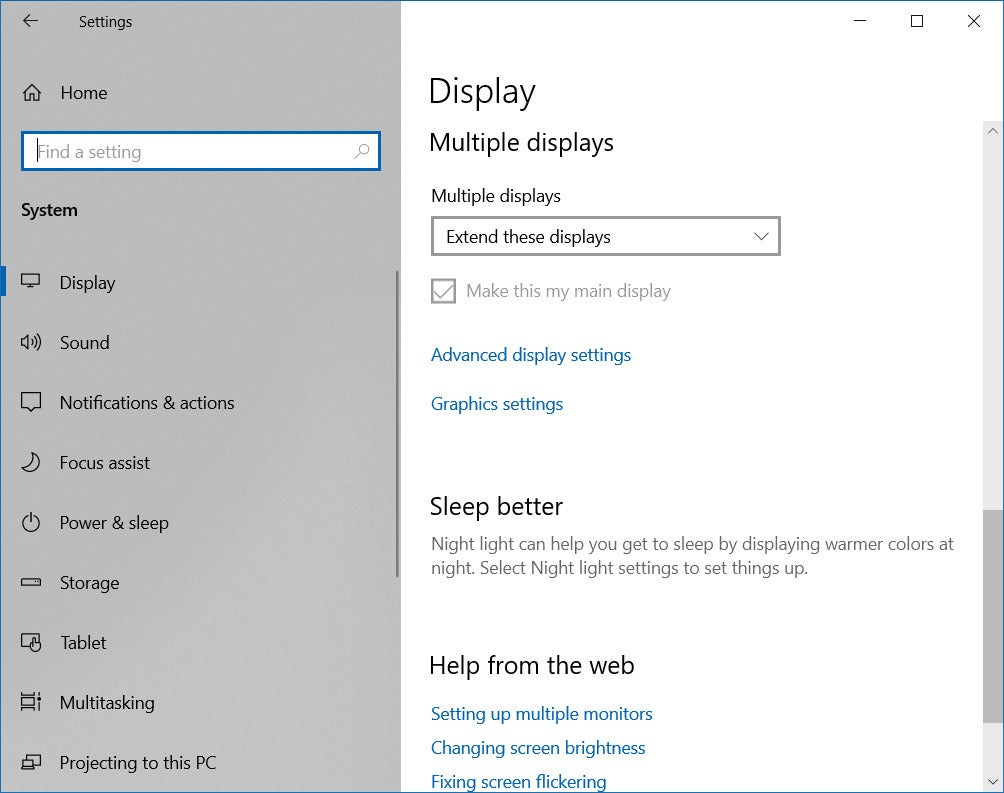
Finally, we’re at the last option where you can set up multiple monitors. If you’re using an older display with your PC it may not be detected automatically. If that’s the case, click the Detect button. Otherwise, you’ll see a drop-down menu labeled Multiple displays. The default is to use the Extend these displays option, which lets you use both displays as one big desktop. That way when moving the mouse across the desktop (to the left or right) the mouse moves to the second display automatically.

IDG
You can also choose Duplicate these displays, which can be helpful if you want to show one display to a group and navigate on the laptop screen facing you. Then there’s Show only on 1 and Show only on 2, which will only show Windows on the primary display (1) or the secondary display (2).
If you do have a multi-monitor setup, Windows 10 will automatically display at the top of the Settings > System > Display screen a graphic showing the number of monitors Windows 10 detects. Here, you can rearrange where your monitors are in physical space by clicking and dragging the monitors around. There are also Identify and Detect buttons to help you organize your monitors.

IDG
Returning to the multiple displays section, there’s a link labeled Advanced display settings. This takes you to a second page where you can view the attributes for each monitor. At the top is a drop-down menu listing your displays.
Then there’s a Display information option that shows various attributes including resolution, refresh rate, bit depth, color format, and color space. If you need to adjust any of these attributes, click the link below Display information labeled Display adapter properties for Display 1. This will change depending on which of your displays you’re currently set to view settings for. If, for example, you switched to view the settings of your secondary monitor then the link would say Display adapter properties for Display 2
Clicking that link will open a properties window where you can set the maximum refresh rate, adjust monitor properties, and adjust color management settings.
Finally, there’s another drop-down menu where you can adjust the refresh rate.
Going back to the primary window for Settings > System > Display > Multiple displays there’s also a link labeled Graphics settings. This opens another secondary page where you can turn on the option to use a variable refresh rate (FreeSync) if available, and a Graphics performance preference preset. This lets you set preferences on a per-app basis. You can, for example, choose to have your games explicitly set to high performance, and opt for power saving performance for web browsing.
For the most part, it’s best to let Windows choose automatically between high performance and power saving; however, you can explicitly set certain apps if you want to.
That’s it for our tour of the default display settings built into Windows 10. Next up is sound, notifications, and focus assist.
Ian is an independent writer based in Israel who has never met a tech subject he didn’t like. He primarily covers Windows, PC and gaming hardware, video and music streaming services, social networks, and browsers. When he’s not covering the news he’s working on how-to tips for PC users, or tuning his eGPU setup.
For all the latest Technology News Click Here
For the latest news and updates, follow us on Google News.
